Arrival


not to be confused with the movie

Where were we… oh yes, AAAAAAAAAAAAAAAAAAAAAAAAAA!!!

A little additional context to round out the picture. On top of everything happening with Juniper and the new horse I was also working out a bunch of details to get our first ever cover crop planted this fall (there will be a post about that eventually) which involved coordinating with the county, and then another county because the first situation fell through at the last minute, and a neighbor with a tractor, and finding seed (where do you buy enough winter rye seed for 15 acres?!) etc. and I also had a doctors appointment and an MRI scheduled because my doctor and the neurologist she referred me to wanted to rule out MS as a possible cause for some things I have going on. Both of them thought it was pretty unlikely I have MS but both of them also thought it was likely enough that it should be officially checked on. I will also have a post on that, but I will not leave you in suspense on this one, I do not have MS, but at the time this was all happening I did not know that, I only knew that two doctors thought it was unlikely but still possible.

Back to the horse saga. Tuesday morning is lots of frantic phone calls to my normal vet plus my friend Sarah’s vet who has been treating Juniper, my neighbor, and my friend Hilary who was our back-up ride, trying to figure out when and where Juniper can get a dental but still be home when the new horse gets here. Luckily Sarah’s vet is able to squeeze Juniper in Wednesday morning and Hilary, who helped me bring Leeloo and Juniper home the first time, has a flexible day that day so she can go with me to pick up Juniper from Sarah’s house, bring her to the vet for her dental, hang out with us there while Juniper comes to from being sedated, and then bring Juniper back to my house.

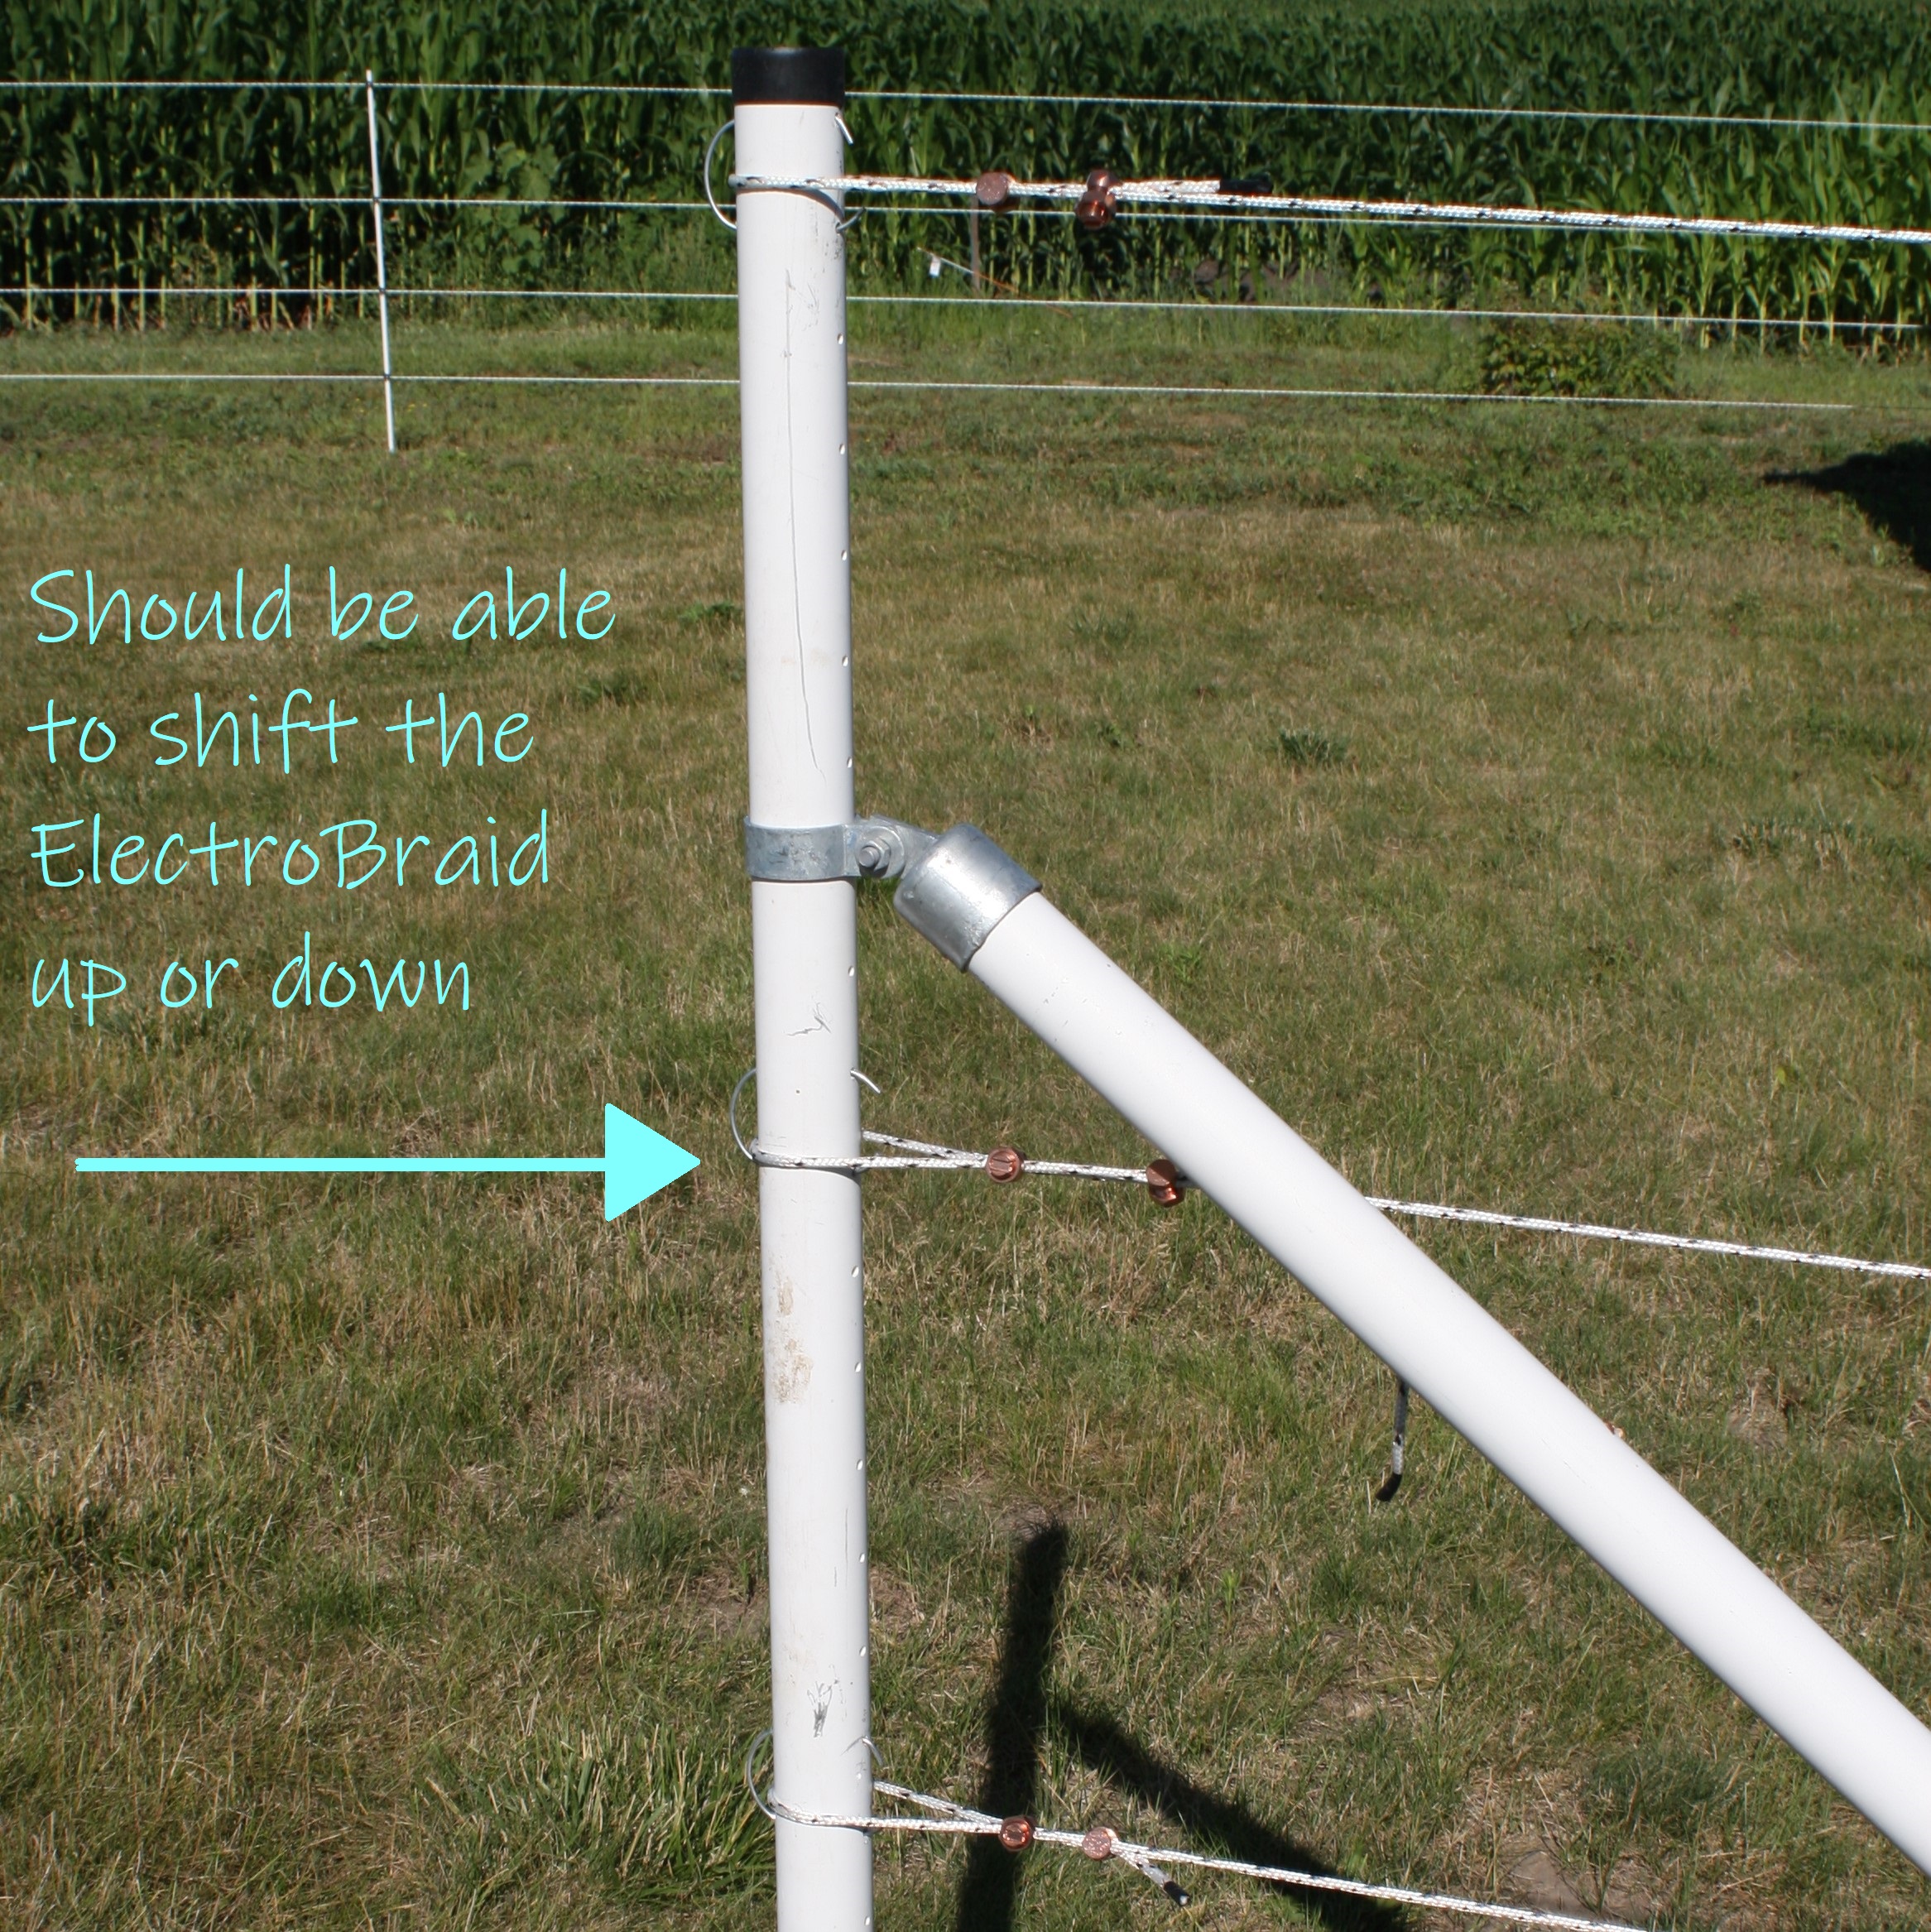
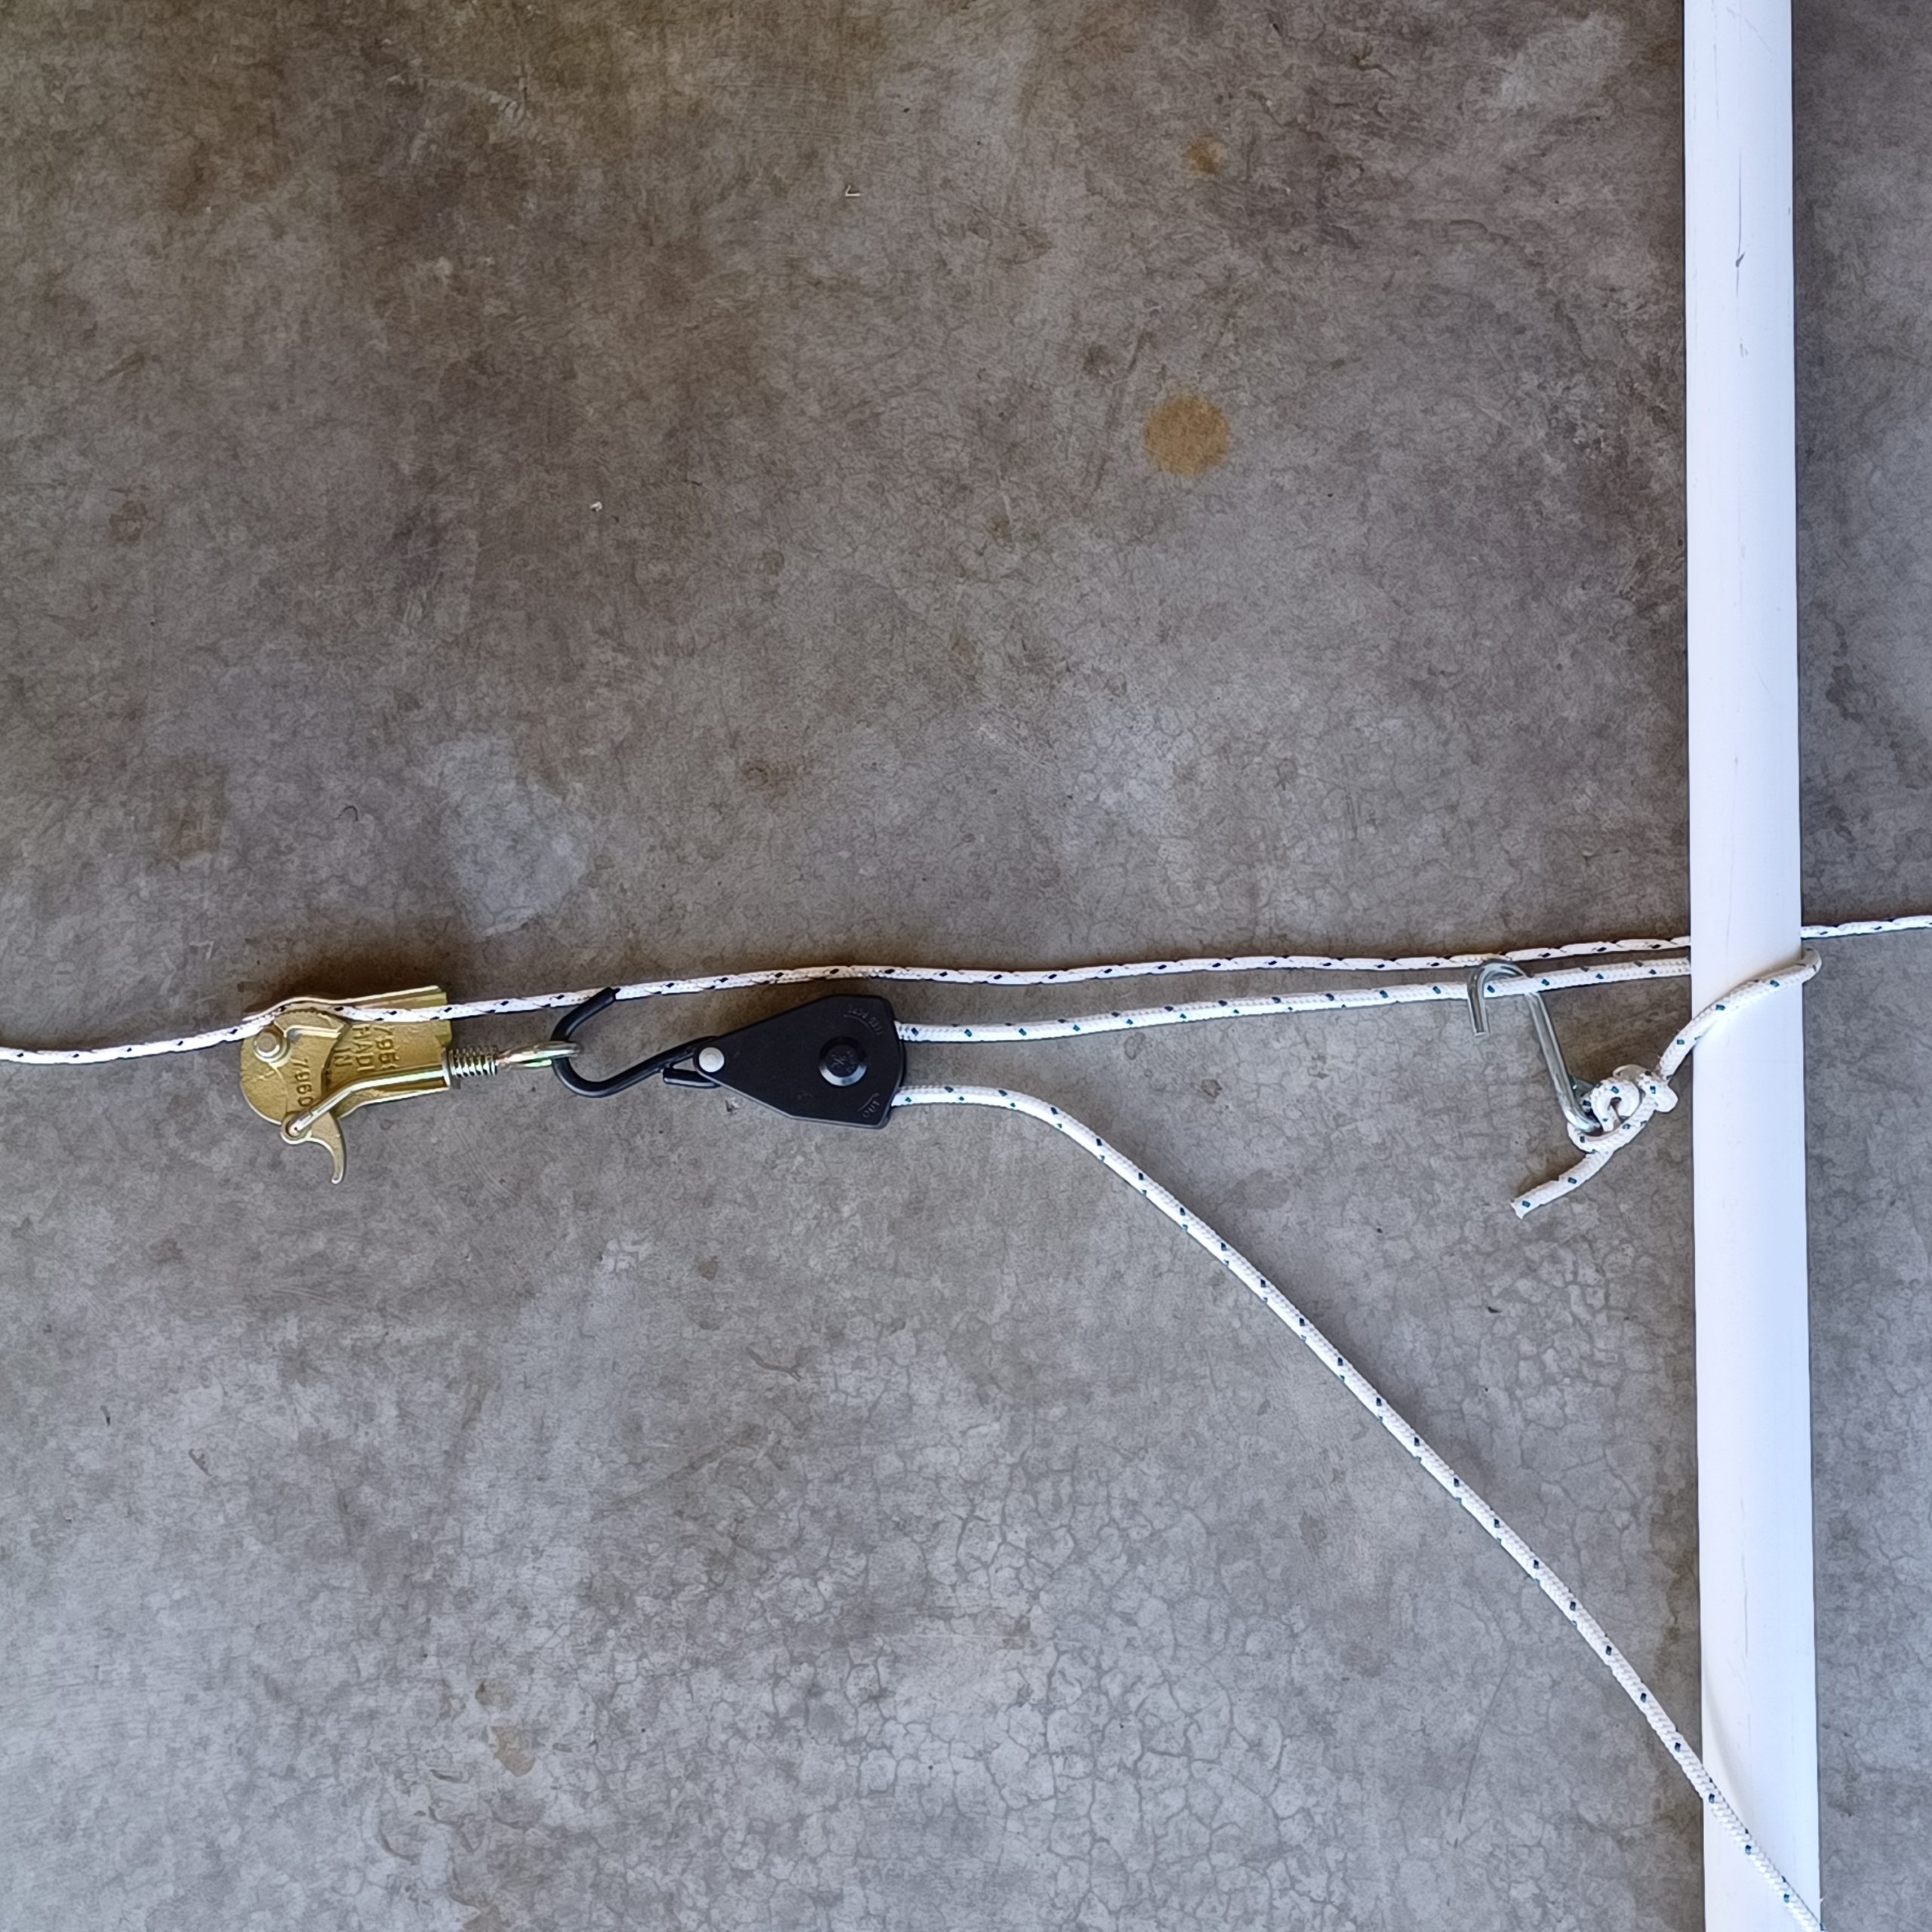
It is at this point that I realize we will have to find a way to separate Juniper and Highlight (I still don’t love that name but I haven’t come up with anything else so Highlight she is) since Juniper will need some careful observation so we know exactly how much she is eating and drinking and to make sure her digestive system is operating correctly (i.e. she’s pooping). I also don’t want to put Juniper through the stress of meeting a new horse when she is clearly not feeling well. However, we are not at all set up for separate pastures. We have one shelter in the fenced in area, it has three bays, but it is one structure. We also only have two gates into the entire fenced in area. After some frantic brainstorming we opt to put up a temporary strand of electric fence coming out from one side of the gate and attaching to the wall of one of the shelter bays which is wood and therefore will not conduct the charge to the entire shelter. We’ll also need to block the tiny passage behind the shelter. This way I can use the gate by the shelters to get to Juniper and then I can walk up and around and use the gate by the house to get to Highlight. Except at the last minute it occurs to me to check in with the seller to see if Highlight has been on grass this summer and of course she has not been, so I can’t just let her out on the grass which is finally doing well with all the rain we got this fall. So now I need to block her off from the grass which means blocking her off from the gate. Then Sarah, who has been taking care of Juniper this summer and through her two colics, asks if I’m worried about Highlight bringing any illnesses home with her. I wasn’t, because she is coming from a very small private location and she passed a wellness exam, and every other horse in the trailer will also have passed a wellness exam, but there is still a tiny chance she could catch something and bring it home. If Juniper were healthy I wouldn’t worry at all, but Juniper is far from healthy right now and it’s just not worth the risk. So, we set up a second temporary set of electric fence on the other side of the gate so that there is a ten-foot space between them and they can’t make contact. I have now effectively created two separate paddocks with their own shelters and a 10-foot space between them. Yay. Neither of them has a gate or access point of any kind. Boo.

Doesn’t matter because I have no other choice as it is now 9 pm on Tuesday night and everyone’s coming home tomorrow!

Wednesday morning – arrival day!

Hilary and I drive separately in case the shipper makes better time than expected and/or the vet runs late. For once things go as planned and the vet sees us right on time. Juniper receives one of the quickest floats I’ve ever seen a horse get and he extracts two molars (photos if you’re curious) but we still need to wait for her to wake-up so she can safely handle the trailer ride. Once we feel she’s coherent enough to hold herself up we head for home, Highlight is scheduled to arrive in 45 minutes!

We settle Juniper into her new arrangement and wait for Highlight’s arrival. It is a little delayed but she is there within an hour and a half. It is in getting the two girls into their respective areas that I realize how much of an issue our gateless set-up will be. We set up the fence so there were plastic “grips” on the ends of the hot lines so we could unhook them from the shelter wall to go in and out, the problem is there is no other support structure for the lines so the moment we pull them off the wall they go slack for the entire length of the run and touch the ground, plus there is no place to actually put them so I have to somehow hold the lines in one hand while trying to get myself and various things (water, feed, hay, medicine, pitch-fork) from one side to the other. And of course the moment the lines go slack both girls try to go through to meet each other. This is not a feasible option for doing daily chores. That means I get to very gingerly climb through the fence every time I need to get to the other side and despite my very careful climbing I manage to shock myself at least once every time I do chores. Let me tell you the hot lines hurt, particularly when it’s your inner thigh that makes contact as you attempt to step over it, but the ground line, which under normal circumstances has no charge running through it so you can grab it like normal to hold it out of your way, you know with your entire hand gripping it, that fucking HURTS when you are touching it and then accidently hit a hot line with whatever random other body part you aren’t paying enough attention to (I have been trying to keep the language pg-13 on this blog for reasons I am not clear on, but this situation is without question an F-word situation, but I digress…). So at least once a day, if not multiple times a day, I manage to shock myself while doing chores. “Why don’t you just unplug the fence?” you ask. Well Highlight is a very personable, very sweet, and very smart horse, and she watches you. She watches me climb through the fence every day to feed her and give her hay and pick up poop, and then she tries to do the same thing even with the fence hot. So turning it off seems like a recipe for disaster. And it turns out I’m right, because even with the lines hot Highlight managed to pull one of the hot lines (the one I gingerly step over) off the permanent fence and right across the entrance to her shelter on the night it’s pouring rain. And the way the line fell it is in contact with another hot line so it still has a charge running through it so when I get home from my 12 hour work day and go to give Juniper her PM meds I find a soaking wet, unhappy, and scared Highlight. So I’m standing in the rain on the soaking wet ground pulling a still electrified line of fence out of her paddock muttering expletives with every grab because everything is super conductive in that moment. Then I have to convince Highlight that the shelter will not in fact attack her and she can go in it, and please go in your shelter and get out of the rain. And then, I have to fix it so she doesn’t try that stunt again and get in a worse situation. Did I mention I worked a 12-hour day and it was pouring rain. Good times.

After that I stop going through Highlights fence to feed her and just throw hay over the fence, and push her feed under the bottom line and use a rake to grab it back out. No picking up poop on her side until we work out another option, which is definitely having them together sooner than planned, but this set-up is not sustainable.

And that was our first week.

Where Did The Year Go


2022 – Year-End Recap

I was starting to write a “goals for next year” post and was feeling a bit disheartened by all the things I had wanted to get done this year but haven’t gotten to yet and decided that it would be good for my mental health to take some time to reflect on the many things we did accomplish this year.

Just the decision to bring Leeloo home without having the full barn setup that I had been dreaming of was a big deal. There were many conversations with many people, and a lot of thinking about goals for myself and for Leeloo, before we even got to the starting gate. That process was the main focus of these posts:

Then there was putting the fence up and electrifying it, which took the whole summer. I understand now why people are willing to pay an extra $30,000+ to have a fence installed. The entire fence process is detailed in these posts: (Fence Part 1, Fence Part 2, Fence Part 3, Fence Part 4, Fence Part 5, Fence Part 6, Fence Part 7, Fence Part 8) and I need to remind myself how much work that was or I start feeling like we should have gotten more done over the summer.

Getting the first two shelters, anchoring them, starting to build the third shelter, then deciding that building it just wasn’t going to happen, was also more work and stress than I imagined. It is obvious now that we never could have built them ourselves, we just don’t have those skills yet, but that wasn’t always easy for me to accept. I am very happy now that we opted to buy them already constructed and that for the third one we went with the company that anchors them for you. The drama around the shelters was discussed in these posts: Give Me Shelter – Part 1 and Part 2, Second Interlude, So Much to Do, Mish Mash, Know When to Fold ThemHayshed – Delivered.

Finding and installing the round pen wasn’t part of the original plan but I am so glad we have it! We haven’t gotten to use it for its intended purpose very often but, it was so very helpful when we brought the girls home and has been very handy many times since then; including helping to separate Leeloo and Juniper each morning during feeding time. Though we are currently having some issues with Juniper turning into a picky eater; if it isn’t one thing it’s another. We discuss the round pen in Gate Expectations and the Fifth Interlude.

HAY! I had been a little worried about getting decent hay for a price we could afford. One of my long-term goals is to have our own hay field and I still feel that way, finding quality hay has been a challenge particularly since we also need it delivered. Luckily we were able to find a variety of hay for this year, including several different people who would deliver, though the quality has been all over the place. The girls like the most expensive hay best (of course) but now that we finally have some hay nets and some haybox lids they at least can’t toss it all over the ground and waste it (I’m looking at you Leeloo).  Hay post – Fourth Interlude.

Then there was finding Juniper – I didn’t talk much about that process on the website but it took a while for us to find the right pony, even when her only job is to keep Leeloo company, well and be cute of course. Finding that next mare, who will be the cornerstone of whatever comes next for us, is going to take much, much longer (Looking For a Baby Maker) – but now we’re starting to get into future goals and that is for the next post.

The ultimate goal of all of this work was to bring Leeloo and Juniper (once we found her) home, which we did! I sometimes forget what an accomplishment that is – it is the culmination of decades of dreaming. Here are the posts about bringing them home and the fun that has been: Coming Home, First Two Weeks, Sugar is Evil, Copy Paste, She’s Lucky She’s Cute, First Real Snow, Work Harder Not Smarter, Winter Woe-nderland.

One of the things I feel the biggest sense of accomplishment about (now that it is over) was something that we hadn’t planned for at all; dealing with Juniper’s eye infection. That was a huge, huge deal, both in terms of time and money, and I am so very, very, happy we were able to heal it (First Two Weeks, The Joys of Medicating Ponies, Mish Mash, Copy Paste, Juniper Eye Update). There was a very real chance she could have lost that eye and we saved it!

Though we weren’t able to build any shelters, we did get several building projects done including the six hay boxes (First Two Weeks, Projects Galore, Hay Contained) and the three compost bays (How to Make Compost Bays). The lids for the hay boxes are so close to being all done and hopefully we’ll get a chance to finish installing them during this “warm” period.

We’re once again getting into future goals but taking time to look back over this year has done what I had hoped, reset my perspective on what we all accomplished in the last few months and made me feel better. We got a ton done, pushed ourselves way, WAY, out of our comfort zones, and, more often than not, accomplished what we set out to do (even if it almost always took longer and cost more than expected).

One other huge accomplishment that I haven’t written about was getting this website up and running. I have never done anything even remotely like this and every aspect of this website has been a learning experience and has been the cause of a lot of swearing and a lot of crying, mostly in the beginning – the website hasn’t made me cry in weeks. I am very happy with how it has turned out and am really proud of myself.

Looking forward to another year of adventures. And of course Leeloo will be there to help:


The Fence – Part 8 of 8


The Final Fence Post

I headed to LeVahn Brothers with a sample of what I was dealing with (hookup wire and irrigation tubing) and explained what happened (broken string, broken rope, stuck wires) and came home with some wire pulling lube and a better rope.

We were also back to a weekend so Nate could help. It went much faster with two people, one person operating the shop-vac on one end and the other handling the string on the other. We got the string through quickly and tied it to our new rope and got that all the way through. Then we tied the rope to the hookup wire, once again using the staggered approach, rope to ground hookup wire, then further down added the hot hookup wire. Then we lubed up the wire and Nate started pulling on one end while I pushed on the other. Slowly, but steadily, we made progress; though there was definitely a point where it became far more difficult, and it was about the same point where the rope had broken. We actually dug up the trench there to see if something had kinked the tube but from the outside it seemed find so we kept at it. Nate keeps pulling and I keep pushing. Then the rope breaks free from the hook-up wire. **** **** **** **** (This whole putting up a fence saga sure was stretching my vocabulary.)

Try, try, try, try again. Pull the string through, pull the rope through, attach that rope to that hookup wire like someone’s life depends on it; tape is cheap, use the whole roll! Nate pulls, I push, and slowly, so slowly, through it goes. We have the wire through the tube!

Now we need to connect the ground hookup wire to the ground rods and the hot hookup wire to the fence itself. I was smart enough to spray paint one roll of hookup wire blue so that we would know which was the ground line and which was the hot line. The next tricky part was getting one continuous line of hookup wire to connect all three ground rods to the energizer. The directions were very clear; it could not be three separate pieces of hookup wire, it had to be one continuous run of hookup wire. That meant we had to strip the insulation off the middle of the wire. That is not easy to do, and of course the video did not show that part; the wire was already conveniently stripped. Wire strippers are designed to cut the insulation and then you just pull it off the end, but when you are in the middle of the wire you can’t pull it off, you need to basically filet it off; very carefully, without hurting the wire, or yourself. We failed on both counts. The first effort was Nate’s. He did manage to get the insulation off, but not without damaging the wire, and in the end it snapped. **** That meant pulling more hookup wire through, though that turned out to be fine since we needed enough hookup wire to do all three of the hot lines of the fence anyway. The second effort was mine. Almost immediately I managed to stab myself in the finger, right through my work glove (picture if you like pictures of injuries). Luckily it was bleeding a lot so I was pretty sure the risk of infection was low; and somehow, despite having a white shirt on, I only got blood on my pants, the cardboard I was working on, the driveway, and the garage floor – my white shirt is still white! Nate had been using the string trimmer at the time with ear protection on so I hadn’t even tried to get his attention knowing he would be done fairly soon. As he’s opening the door to the mudroom he is asking “How did you spill red paint by your shoes?” Then he sees me with my hand in the air (trying to keep it above my heart to stop the bleeding long enough to wash it) and is like “Oooooohhhhhh, that’s not paint.”

We took a brief break but opted not to seek medical attention and went back out to finish this ****ing fence. I was far more careful this time and managed to get the insulation off without injuring myself or the interior wire! With that we attached the ground hookup wire to the ground rods and attached the hot hookup wire directly to the top line of ElectroBraid. Then we used a short piece of hookup wire to connect the top line of fence to the second from the bottom line of fence, and then another short piece to connect the second from the bottom line to the bottom line. Then another piece of hookup wire to attach the second from the top line of ElectroBraid to the closest ground rod (we opted for a hot/ground system because that was recommended in places where the ground freezes or when there are drought concerns.) Then we had to dig a trench under the fence to lay hookup wire below it to get electricity from one side of the gate to the other (I let Nate dig that trench, 115 feet of trench digging was enough for me – plus you know, the stab wound). One option for that is to just do a single piece of hookup wire that connects all three hot lines on one side to all three hot lines on the other, and then do a second hookup wire to connect the ground line on one side to the ground line on the other; however according to the internet (which is never wrong) the possible issue with that is if something goes wrong with one line of the fence it can affect all of them, whereas if you connect top to top, middle to middle, etc. and something goes wrong with one line, or you need to disconnect one of the lines for some reason, it won’t impact the other lines of fence. We decided to go with the top to top, middle to middle, etc. option. By this point I was an expert at getting wires through tubes and it was only a 12-foot tube to get under the gate and up on each side, so I managed that on my own all in one day!

Once everything was wired on the fence side, we had to get the hookup wires attached to the energizer which was in the garage. This involved drilling two small holes in the side of our garage which neither of us felt super comfortable doing, but we did it. Hopefully we didn’t mess anything up too badly; we used a LOT of silicone sealer.

We used a lot of silicone sealer, we are both paranoid about putting a hole in our wall. The bricks are holding up the end of the irrigation tubing which is folded over to prevent water from running down it. That also didn’t go as well as the directions implied. 

We still need to patch up the drywall on the inside but that is low on my priority list. Wondering why there is so much masking tape? That’s because we don’t know what we’re doing and it took a few tries to get the hookup wire through the wall.

We attached the hot hookup wire to the hot terminal and the ground hookup wire (thank goodness for the blue paint) to the ground terminal and plugged the energizer in. We officially have an electric fence!

I went around with the voltage tester and it seems like we have a decent charge all along the fence. There was some concern because of how far the various parts of the fence are from one another and the house is in between them, but according to the voltage tester everything seems to be working. Also, according to my hand, which got shocked when I went to fasten the gate. We really need better gate closures.

The Fence – Part 7 of 8


Electric Boogaloo

The idea of working with electricity made both Nate and I pretty nervous so we watched and re-watched the videos from ElectroBraid about how to hook up the fence and I did a lot of internet searching. The two things everyone agreed on were that the energizer or fencer needs to be protected from the elements but not too far away from your fence, and a good grounding system is critical to the operation of your fence. Those were the only things they agreed on. Here is a brief summary of some of the other advice:

You need to use copper ground rods – no, you need to use galvanized steel ground rods.

You need one ground rod – no, you need two – no, you need at least three.

You can’t put your grounding system within 50 feet of any underground water, electrical lines, telephone lines, buildings, or other grounding systems – no, it has to be 30 feet away from all those things – no, it has to be 75 feet away from all those things – no, it’s just electrical grounding systems and telephone lines you have to worry about – no, it’s just water – no, it’s just water running to your house – no, it’s just buildings with foundations – oh, and the ground rods should be in a low wet shady spot. Also your ground rods shouldn’t be more than 50 feet from the energizer.

What?!

Bluebird Fencing had already supplied us with three grounding rods and hookup wire so that part was decided for us. What we had to do was figure out where to put the ground rods.

We don’t have a barn (yet) so our only power source is the house and we did not design the house with the thought of having to run power to a fence. Our well is located on the north side of the house; the septic system, drain tile around the foundation, and propane come in/out on the west side of the house; the buried electrical lines come in from the south, wrap around the east side of the house and actually connect on the north side (that way the big ugly electrical box wasn’t on the front of our house). That means there is no place anywhere close to our house where we could put this grounding system. After a great deal of thought, and consultation with several people, we decided to put the three ground rods behind the first “barn” shelter – which is currently hay and wood storage. There is a little triangle of space there that isn’t fenced in and is shaded by the shelter for half the day and out of the way of any foot traffic.

The problem is this spot is 95 feet from the house. I did another round of thinking and looking and there really isn’t any other place we can put this grounding system so that means running hookup wire 95 feet in addition to the 10 feet between the ground rods themselves. That is one hundred and fifteen feet of wire to run, all of which needs to be buried, that means one hundred and fifteen feet of trench digging – fun!

We looked into renting a trencher, but you need a trailer to get it and we have no vehicle capable of hauling a trailer. I did briefly look into getting a hitch for my car, but after finding one and talking to our mechanic we decided not to. At that point I decided I had wasted enough time and had I just started digging that the trench it would have been done by now – so time to get digging!

It sucked! I would not recommend digging 115 feet of trench by hand if you can help it, but it’s not a complicated job so I couldn’t make mistakes and I didn’t hurt myself so that’s a thing.

While taking digging breaks I was also trying to find “polyethylene tubing” which is what our fencing directions said to use to run the hookup wire through when burying it underground, but no one could really tell me what that was. In the end we got irrigation tubing that would be wide enough to fit four lines of hookup wire, which is what we would need to go under the gates; the idea being that the extra width would make it easier to run the two lines (hot and ground) from the garage where the energizer would be to the fence and the ground rods behind the “barn” shelter. We were a little concerned about being able to get 95 feet of hookup wire through a small tube. It was suggested that we first run a string through the tube then tie the string to the hookup wire to help pull it through. The original suggestion was to use a shop-vac to pull the string through but I didn’t think that would manage over 95 feet so I tied a nut to the string and hoped gravity would help. It didn’t. I did eventually get the nut and string through, but it was a ridiculous endeavor. I would feed string through the end of the tube by the house and then shake the tube and slowly work my way down shaking it until I heard the nut rattle. Then I would use a magnet to try to pull the nut along a bit, but it would invariably get stuck, and I’d have to go back up to the top and feed more string in and shake it down. Part of the problem was that the tubing had spent its life up to that point coiled tightly and having to lay flat was not something it was interested in doing, so though gravity was helping us go down the hill it was hurting us on those coils. I did eventually get the nut and string all the way through, but it took the whole afternoon. Then I decided to bury the tube in my trench before getting the hookup wire through it. Was this a good idea? I don’t know. I was concerned about guessing the amount of tubing I actually needed since I could not get it to lay even remotely straight, and I didn’t want to cut through the tubing after the wires were in it. Even now, after having finished everything, I’m still not sure if burying the tube before getting the wires through was a good idea or not.

At this point we have the string through the tube and we have the tube buried in the ground. The next day I tied the string to the ground and hot hookup wires and started feeding them through. I would get so far and then they would stop going in and I would have to go down to the other end (95 feet away) pull on the string some, then the string would get stuck and I’d have to go back up to the top and push the wires in some more; back and forth, push and pull, back and forth. Then the string broke. **** (I will let you guess which expletive I said.)

From the amount of string I had pulled out I guessed I had made it a little less than half way. Try again. I pulled out the wires and untied them from the string and decided to use the shop-vac as recommended since the tube was buried and there was no other way I was getting a string through it. It worked, sort of. The shop-vac doesn’t fit snuggly on the tube so I had to hold my hands around it to create enough of a seal for the suction to work and if the string hit even the smallest snag it wouldn’t pull into the tube. That meant I would be on one end with my hands cupped around the tube and the shop-vac for a little while but then I’d have to turn it off, go back up to the top and make sure the string hadn’t caught on anything, like a blade of grass; seriously the smallest snag would stop all progress. Back and forth, shop-vac, then feed the string, back and forth. The shop-vac did eventually pull the string all the way through, and it was much faster than my first attempt with the nut and gravity. This time instead of tying the thin string to the hookup wire I tied the string to a stronger piece of rope and tied that rope to the hookup wire. I was also smarter and staggered the ground wire first and then the hot wire farther down so that the size ramped up gradually: string, rope, one hookup wire, two hookup wires. Then it was back to feeding the wire in on one end, then going down pulling on the rope on the other end, back and forth, push and pull.

Then the rope broke. **** **** (Again, I shall leave my reaction to your imagination.)

Time for a trip to LeVahn Brothers.

The Fence – Part 6 of ??


Let There Be Gates

We still faced the dilemma of no truck and no delivery option for gates; and no place that rents trucks also sells gates. In the end we opted to get these heavy duty bull gates from Fleet Farm, which were on sale at the time, and rent a truck from the Menards just down the road. The first time we went to get the gates they were out of two of the sizes we wanted. We came back home, did another search and discovered they were sold out anywhere we could reasonably drive (being on sale), so we opted to change the sizes for the two smaller gates and try again the next day. They had the new sizes, so we bought the gates in the store, got the little slip that lets you into the “yard” area to pick them up, then drove two miles down the road to Menards, rented the Menards truck, then drove the Menards truck back to Fleet Farm to get the gates. The gate attendant at Fleet Farm gave us some lip about having a Menards truck – dude, if Fleet Farm rented trucks I would have rented a Fleet Farm truck but you don’t, so shut it! When we were in the yard loading our gates, I noticed that the sizes we had originally wanted but were supposedly sold out were sitting right there – of course. I also noticed that I had forgotten to bring any tiedowns this time; we drove VERY slowly home hoping we didn’t lose a gate on the way. They all made it safely and I managed to get the Menards truck back within the 75 minute window so I didn’t get charged the extra $15!

Now we had to figure out how to get the gates on our posts. The normal way to hang a gate is to drill a large hole through your wood fence post and put this giant J bolt through it, but since we have fiberglass fence posts that isn’t an option. The company we bought our fence posts from do sell gate hinge assemblies, but they are $80+ per gate and when you look, there isn’t much too them. I felt there had to be a cheaper option, and we found one! It looked to be about the same thing and it was only $20 per gate. The size wasn’t a perfect fit, but I measured and it looked like they were just a tiny bit bigger so I figured we could make them work.

Once the hinges arrived we went out to install the gates and ran in to our first issue. We had already put all the stuff (the braces and the ElectroBraid) on the end post on the hinge side of the small gate which meant we couldn’t slide the gate hinges onto the post. We considered taking everything off and starting over, but considering we had already tensioned the ElectroBraid five thousand times (okay, nine times) we said, f-it. This is temporary and this gate is mostly going to be used to go in and out to fill and clean water tanks so who cares what side the hinge is on.

As you can see in the picture the cheaper hinge assembly was also more than “just a tiny bit bigger” and was, in fact, too big to use.  Of course. After some staring and swearing I realized I could probably combine some of the pieces of the hinge kit we got with some of the extra pieces from the corner posts we wound up not using because I went and bought a round pen the first time I tried to buy gates. Once the barn is built – it will be built! – we’ll use all the corner posts, but I’ll have figured out a better hinge solution by then (hopefully).

Now that we had a temporary working solution for the hinges, we just had to figure out where to put them on the end post itself. This also proved super challenging; if we had the end post fully installed the braces would be in place and we couldn’t get the hinge parts on, but without having the post up how were we supposed to know where to put the hinge parts? Also someone had to hold the gate while the other person figured out where the hinges should go but the end post wasn’t fully installed so someone had to hold that too. The whole thing took us way too long to figure out, but we did eventually get the end post installed with the hinges on. Then we went to get the J bolts off the gate (they come attached sideways for transport so they don’t stick out) and discovered that we couldn’t. They would not budge. At one point we were actually bending the gate itself, not good. That ended our very frustrating evening; we decided to pause and try again in a few days after a trip to LeVahn Brothers.

The gates are designed with one hinge welded to the gate itself and the other bolted in place so it can be adjusted. We were able to get the adjustable part off and bring that and its stuck J bolt to LeVahn Brothers. I walked in and when they asked what I was looking for I handed them my stuck bolt and said I need to get these two things apart. He said, “I can do that for you.” took it to the back and returned shortly with them separated. Which was great, but I still had seven more stuck things at home and four of them were welded to the gates so I couldn’t bring them into the store to have him very kindly un-stick them for us. It was determined we needed a breaker bar and a really large wrench. I brought my new acquisitions home and they worked like a charm, everything came apart with ease. The proper tools are so important!

In the intervening time I also got much smarter (trying to do these things at night after work is never a good idea, no one is at their smartest after a long day of work) and realized that I could lay out the end post on the ground and lay the gate next to it along with all the other parts and line up where we needed things without anyone trying to hold anything, also we didn’t need to get the gate hinges exactly correct while installing the end post, we just needed to have them in-between the other stuff in the vicinity of their final location.  We also had a friend come over to help us out. Having a third set of hands, proper tools, and a better plan made a huge difference! With all that the second gate went up much faster and easier than the first.

Now we had gates; not 100% square and level, but good enough! On to the last step of the fence, electrification. At this point I have stopped saying to myself “How hard could this be?” or “What could go wrong?” Everything about this has been harder than it should have been, and at this step what can go wrong is electrocution, let’s not tempt fate.

The Fence – Part 5 of ??


Too Much Tension

After the fifth insulator snapped I emailed Monica at Bluebird Fencing (if you are brand new to fencing I would really encourage you to find a local, independent, fence company to work with; yes we could have gotten things cheaper elsewhere, but Monica has been so helpful, quick to answer, and always kind, I don’t think we could have done this without her help – totally worth the slightly higher cost). I emailed Monica and explained what we were experiencing, and she hadn’t heard of any other customers having the issues we were having. She did say that the insulators are designed to snap if they are under too much pressure, the idea being if your horse gets caught up in the fence and you had to choose between an insulator snapping or their leg you would always choose the insulator. But because of that the insulators don’t do well if they are bowed even a little bit. The moment I read that I flashed back to an image of using the socket wrench to get those little nuts on as tight as we absolutely could – oops. She also mentioned that you only wanted enough tension on the ElectroBraid to keep it from sagging, but no more than that – big oops. In my defense the video we watched explicitly said to pull on the ratcheting part of the tensioner system until you couldn’t get any more slack out. I am not an unusually strong person, I am probably slightly below average, so clearly it wasn’t my inferior strength that did it. That video lied to me!

With that I went back out and loosed every corner roller insulator (which worked well for most of them, though a few refused to move – so we’ll just have to hope for the best on those) and went back through and loosened all the EectroBraid lines. I ran into issues on two of the lines though because we had cut off the line to use on the next run and there wasn’t enough on the ends to slacken it so there are a few interesting splices; but in the end I got everything loosened up and we haven’t had any issues since then. Yay!  I do have some tips for how to tell if you have over tensioned your ElectroBraid.

How to tell if you have over-tensioned your ElectroBraid fence:

  • You can feel the ElectroBraid vibrate when you touch it.
  • If you are wearing a hat and the hat touches the ElectroBraid you can hear it.
  • The tensioner kit won’t release (as soon as I took some of the tension out of the lines the tensioner kit release tab worked like it was supposed to – no more safety release knots needed).
  • The ElectroBraid that is looped around the end posts cannot be shifted up or down at all.

So here is the fence with the ElectroBraid up; it only took a month.

If you are looking at those pictures and wondering if the distance between the top two lines is a little wider than the others, you would be correct. If you are wondering if that is driving me ever so slightly crazy, you would also be correct. If you are wondering why I wouldn’t fix it– think back to the fence update regarding the corner posts and how we decided that to speed things up we would stop being so picky about the location of the diagonal braces. Well, turns out if you aren’t so picky you wind up taking up a lot of the potential spots for the corner insulators. The directions said to have one of the diagonal braces at the 8th hole and then put the other one either above or below it. We got pretty flexible with that and some were above, some were below, some where way above, and some were way below. But that meant the fence line had to be above the highest one or below the lowest one and the least awful choice was to go below the lowest one. For a brief moment I considering redoing the corner posts that were too low, but it was about half of them and that was not going to happen. Next time we’ll make sure all the braces are at the 7th and 8th holes so that I can have all the lines spaced evenly. Our experiences are definitely cautionary tales, not instructional guides.

Now to just find those gates!

The Fence – Part 4 of ??


Under Tension

While the search for gates continued, we started installing the ElectroBraid; running from one side of one gate to one side of the other gate.

Before we get in to details, I want to remind everyone that these are more cautionary tales than instructional guides and this post in particular should not be viewed as a “how-to” but as a “how-not.” For those of you who have installed this kind of fence this may be like watching a small, not very serious, train wreck unfold.

Step One – Install the Corner Insulators

The corner insulators have a roller allowing the ElectroBraid to freely change direction and we needed to put them on all the corner posts and end posts. You may be asking yourself – “If the rollers are to change direction why are you putting them on the end posts?” That is an excellent question that I should have asked myself. As with everything else this turned out to be harder than expected. Though the insulators are pre-drilled, it is a pilot hole and isn’t threaded, so getting the bolt through requires some pressure. The back of the insulators are also flat and the posts are round, so trying to hold a flat surface against a rounded surface while putting pressure on a long bolt wasn’t easy. Particularly not with my still not fully functioning wrist. I was leery about using anything motorized since we were working with plastic and on unstable surfaces and I am accident prone.  After doing the first three posts the hard way I decided to pre-screw the bolts into the insulators in the house on a nice flat surface. That way I felt comfortable using our impact driver and it went much faster. That part worked as planned. The issue is that the holes in the posts weren’t drilled nice and straight through the center of the posts, they were almost all off just a little bit. Sometimes this didn’t seem to matter and the bolts slid right through on the first try. And sometimes I spent 45 minutes (forty-five minutes!) just getting one stupid insulator in. I put each bolt through individually to make sure that it would work, yes worked fine, but when they both had to go in – NO. At one point I even took the insulator all the way out and put it in from the other direction just to see if I had lost my mind and the two bolts just popped right in!! Then I put it back on the side it had to be on and – NO. Had there been a table available to flip at that point I would have. We did get them all it but it wasn’t the quick afternoon project I thought it would be. I was also really worried about the fact that these insulators, which seem to be a critical aspect of the fence system, are ultimately held on by two tiny little nuts.

So I really tightened them; breaking out the socket wrench! Okay maybe it was also an excuse to use the socket wrench, which I enjoy using way more than is normal. Nate helped with some of this, but at one point tightened that little nut so much he broke off the end of the bolt… oops. So then I took over that part – though at one point I also tightened to the point of hearing a little crack…. oops again.

Step Two – Install the First Line of ElectroBraid

Run one line of ElectroBraid through all the corners and then use that to locate the inline posts so they are actually in-line and you don’t look like you put the fence up while drunk. This is a legitimate concern; I had put up some marker posts for the farmer so he would know where not to plant this year and despite several attempts I could never get them even remotely straight. This way worked much better! To be extra sure we had them straight we decided to run both the top line and the bottom line and to tension both lines. Particularly because on our two very long runs we couldn’t get the bottom line up and off the ground even with all our by-hand pulling. I ran the top line of ElectroBraid through all the corner insulators and connected it to one of the gate posts with one split-bolt connector as directed. Then I went to the corner before the first long run, put on the tensioner kit which was much harder than the video showed, pulled it, and managed to snap something; luckily not in my body! I went to look, and my single split-bolt connector was no where to be seen. Try, try again. I put the ElectroBraid back on; I used two split-bolt connectors this time and I tightened the ever living daylights out of them. I went back to the corner, reset the tensioner, pulled, and it worked! On to the next corner. Because we have such long runs we had to use two tensioners. You put a tensioner on one corner and pull out as much of the slack as you can (which is what the video tells you to do), then put the second tensioner on another corner, again pull out as much slack as you can, then go back and get the first tensioner off that first corner and move it down to the next corner, repeat until you’ve gotten all the slack out of the line. The problem was we couldn’t get the tensioners to release. There is this little release tab that is supposed to let go and of course it wouldn’t. Most of the time I would just wiggle the hook part on the other end enough to get it to slip off but a few times we had to use the butt of a kitchen knife to push the tab to release it but each time we did that it felt like it was going to snap off. And then it did. Of course. The next day we purchased another tensioner, and I had the genius idea of using a quick release knot (the kind you use to tie a horse so you can release it quickly in an emergency even if it is under a lot of pressure) on the other end of the tensioner so we could use that to get it off. That worked much better; most of the time.

Side note – this is a good reminder that the basic quick release knot isn’t actually the best one to use because sometimes if things pull just right it won’t release. I really need to re-learn the better version to use with horses. Back to our tale of mishap.

I also realized that the metal clamp part of the tensioner system goes on much easier if the plastic ratchet part isn’t already hanging on the one end. I have no idea why this makes a difference, but it did. Now we had the top and bottom lines up and tensioned. If you touched it you could feel it vibrate from the tension and if our hat brims touched the fence line you could hear it hum.

Step 3 – Install the Inline Posts

We had gotten what we thought was a rod to use to put in pilot holes in the ground for the inline posts. It was three feet long, metal, pointed on one end with a handle on the other. We would get that positioned, Nate would mallet it in, then we’d pull it out and put in the 8-foot inline post and then pound that in. On the very first try Nate managed to break our new mallet. Of course. This is why buying the absolute cheapest option doesn’t always save you money. Luckily I had also bought a more expensive mallet and hadn’t returned it yet so the more expensive one it was! We got through about half the posts before our metal pilot hole thing hit a rock and went from being a T to a J. Of course. Another run to the store – except they didn’t have any more. So I started looking online to see if I could find one and it turns out they are not pilot hole tester things, they are their own grounding rods to use with temporary systems. Oops. So now what? Driving 8-foot-tall posts into the ground straight was close to impossible before, how are we going to do it now? Bluebird fencing mentioned that some clients have used a giant drill bit to drill a pilot hole into the ground to get them started so I went searching for that. Best I could find was 18” long. Not ideal, but better than nothing. This is also when I re-discovered my complete inability to drill straight. You could offer me $1,000,000,000 and all I had to do was drill one hole straight in the ground and I could not do it. The first one I tried I think I drilled 20 holes trying to get it in straight; truly ridiculous. I did eventually get better. The trick was to keep drilling into the same spot, somehow all my mistakes slowly fixed each other until I was close enough to straight. You would also think that if every time I was too far up and to the right I could correct for that but no; I was almost always too far up and to the right, except for the two times I was too far down and to the left. Regardless I got them in and straight enough to be acceptable.

Step 4 – Install the Insulators on the Inline Posts

We used quick clip insulators for the inline posts. You slip them on the post, twist them to get the ElectroBraid in, and then screw them in place with a tiny screw in the back. One thing we actually did right was to measure out where all the insulators were on the corner posts and then pre-marked all the inline posts in the garage before installing them. The top and bottom lines were already up and tensioned so getting them into the insulators was much harder than the directions indicated. Nate did discover the hack of putting the insulator on the top line of ElectroBraid first, and then putting the insulator on the inline post, which was much easier, but that wasn’t an option for the bottom line.

Step 5 – Install the Remaining Lines of ElectroBraid

We were in the middle of putting up the middle two lines of ElectroBraid when this happened:

That top line is NOT supposed to cut across like that. No big deal I thought, that was the corner post where I had heard the crack so I had probably cracked that corner insulator and that is why it broke. We released the tension, put on a new corner insulator, and re-tensioned that line and then continued on. The two middle lines went better. Putting them through the insulators before tensioning it made it go much faster and we got better at positioning the quick-release knots of the tensioners so that they would, in-fact, quick-release.

With that we had the wire up and run for about 2/3 of our fence line. YAY!!!

I then started counting out the insulators for the rest of the fence so I could pre-screw the bolts in and realized that we were short. That can’t be right! I counted everything when we went through the corner post debacle. It was at this point that I realized you aren’t supposed to use the CORNER rolling insulators on an END post. You are just supposed to loop the ElectroBraid around the end post. Of course. The distance to travel around the outside of the post is just a bit longer than going through the insulator and the bottom line was already so tight there wasn’t any slack to work with so I had to go and loosen it at the other end and discovered that we had over tightened the split-bolt connectors and the ElectroBraid was starting to fray. Of course. So now we have to loosen all the connections just a little bit. Back to the bottom line – we had to put everything into tightening it to get it around the end post but we did it! And then another insulator snapped and there went that bottom line. Of course. We loosened the other end a little more and tried again and then it stayed.

Until two days later when not one, not two, but three of the lines broke their corner insulators.

Of. (expletive of your choice). Course.

Gate Expectations


Went looking for gates and somehow bought a round pen

Though we got almost everything we needed for our fence from Bluebird fencing we did not get the actual gates. We also wanted to get something to temporarily close off part of one of the shelters so we could use it as a makeshift stall until the barn is built. However, it is temporary (I will get my barn!) and anything 12-feet long, at least 4-feet high, and strong enough to stand up to a horse is going to be expensive so I wanted to get something we could repurpose – something like a 12-foot round pen panel (also called a corral panel) or gate. This meant I was looking for gates for the current track system plus at least two 12-foot corral panels or gates for our temporary stalls.

The issue is that to be horse safe these are inherently large, heavy-duty, gates and therefore not something we can transport in either of our cars. It also means that if you find a place selling good products at decent prices, but they are outside of your state, the freight costs eat up any potential savings. I had been looking at the stores in our area that do sell them, Fleet Farm, Tractor Supply, and Runnings (haven’t been to it yet but I’ve heard good things). Unfortunately, they either don’t deliver, or delivery added an extra $100+ to each gate and their websites were not easy to search or use to compare products. That ridiculously long video from Cashmans also spends time talking about corral panels and he mentions the importance of construction and materials, he also mentions many places don’t say what gauge their metal is, so you have go by the weight of the gate or panel to guess. He was correct in this, except many of the sites I was searching didn’t disclose the weight information either – great. But I kept finding these smaller operations in other states selling quality gates and corral panels for cheaper than the big stores and I felt like there had to be one like that closer to me – and I found one!

Quick side-note, from the beginning of this farce project, I have been contemplating who will be keeping Leeloo company once she is home. During that contemplation it also occurred to me that whoever it is will be new to me and though some people are cool working with new animals out on a trail or in a field I am a cautious person by nature (there is a reason my current Wordle streak is 221 wins but my average guess length is 4.2) and prefer to work in an enclosed area. Ideally one not enclosed by a barrier that will shock me or said animal if we accidently make contact with it. After that first corner post took us an entire day to install I asked Nate how he would feel if we modified the original plan and put a round pen in the center of our track system instead of another electrified fence run. This would save us four corners and two end posts, so we would only have to do 12 more and not 18 more! He was open to the idea and became more open with every corner we installed. This meant as I was searching for gates, I was also kind of low-key searching for round pens as well.

Livestock Panels of MN is located only forty miles from me and sells gates and round pens – perfect! It is a side project for someone with a contact in Texas, every couple of months they get big shipments of corral panels and gates and then sell them out as single items or entire round pens. The best part is they deliver and they are close enough that the delivery fee is super reasonable! However, at that particular moment they only had 10-foot panels and 4-foot wide gates and wouldn’t be getting anything new for at least a month or two and I thought we would have Leeloo home before then – HA! But they did have a 60-foot round-pen package available and the price was really good; I bought it and they delivered it the next day!

We still need gates though….

Fence – Part 3 of ?


Yet Another Fence Post

We did get more efficient at installing the corner posts. If you continue watching that hour long video I mention in Fence – Part 2 there is another clip with more details and tips. Still rather unrealistic though; they show a single person installing a corner post by themselves like it’s no big deal. Getting the proper tools was probably the biggest help as was assembly-lining some of the steps in the shade of the garage. But it wouldn’t be us if there weren’t some snags.

All of the vertical posts and the diagonal brace posts need aluminum inserts that had to be screwed in place with set screws; after the first three corners we decided to do all of that at once in the garage, where it was cooler and less buggy. That was when we started discovering a few additional missing or faulty parts, first it was a missing nut, then two fused together washers, then a faulty insert. By then I was getting concerned and decided to go through every bag of parts to see if we were missing anything else. All total we were missing: one nut, seven set screws (one bag was missing every set screw!), and nine washers (another bag was missing every washer!), plus the faulty insert. I contacted Monica at Bluebird Fencing who was very apologetic and who immediately contacted Geotek and they were great about it and overnighted me every missing piece, and while we were at it we got a new hand-tool hub so we could actually use all four handles! My overall review of Geotek is that their customer service is amazing, but they seriously need to invest in a quality control process or person! They have answered every question we’ve had very quickly and have sent us every missing or malfunctioning part we have notified them of within a day or two, I just wish I hadn’t needed so many things replaced.

Did you see that “we have notified them of” bit? Two of the gate braces had their insert holes drilled facing the wrong way but we didn’t ask to replace them because they still function, we just had to dig a deeper hole to get the wrench down there to tighten the set screws. The other, bigger, issue we haven’t dealt with yet is that one of the horizontal braces has an endcap facing the wrong direction. One endcap needs to face up and the other needs to face down and instead this one is turned only half-way making it unusable. We’re hoping we can fix that ourselves but we haven’t tried yet.

In the end our best time was two and a half corners in a single day, not great, but much better than one a day. Practice helped of course, but so did relaxing the standard on how level the vertical posts needed to be (except the gate posts, we tried hard to get those level) and we stopped being so picky about where the braces ended up on the vertical posts. We made sure one always landed at the eighth hole, which is what the directions said, but we stopped caring if the second one was directly touching it. We did learn a lot and I have some tips for installing this type of corner system; I’m guessing some of this would apply to other types of corner systems as well.

Tips for installing the Geotek Common Sense Fence and Mule System:

  • Check EVERYTHING you get when you get it to make sure nothing is missing or faulty – literally every nut, bolt, washer, etc.
  • Have the proper tools! In this case we needed a needle nose vice grip, two wrenches and one of them absolutely must be a socket wrench (which is my new favorite tool ever), a tape measure, and a level (this wound up being optional for all but the gate posts – time will tell if that was a good choice).
  • Have at least two people, three is even better. If you have loamy soil and you buy longer bolts you might be able to do this by yourself, but if you are working with what they give you or you’re dealing with heavier soil, you need at least two people.
  • Pre-measure and mark the vertical posts for where ground level should be and mark where the target hole is for the diagonal braces.
  • If working with clay soil stop and water it occasionally if it gets too hard to work with; that helped a lot.
  • Stop partway through installing the augers and check for angles. For the vertical post try to get that auger straight down and for the diagonal ones stop intermittently and put the brace on and see where it is lining up with the vertical post. It is easier to correct as you go then after the auger is all the way in the ground.

For anyone interested in installing the Geotek Common Sense Fence and Mule System I did a voice over of that somewhat helpful video clip with our experience compared to the video.  You can watch it on our new Lantern Farm MN YouTube channel. Unfortunately, since both Nate and I had to actually be involved with the installing of our own corners we weren’t able to record our process, but I did take pictures:

Having the right tools makes all the difference!

Putting all the aluminum inserts in at one time sped things up, just make sure you put the metal braces on the diagonal posts first!

Pre-marking ground level makes this step much easier – make sure you can see that mark from every side.

Our handles almost always hit the ground before we got the diagonal auger all the way in so we had to dig a small trench to finish.

We are way too low on our angle for the diagonal post. Getting that angle right is the hardest part of the process.

We needed to clamp the metal braces in order to get the bolt far enough through to also get the washer and nut on it.

We now officially have all the corners up and one end post for each of the two gates. We just need to find, purchase, and install gates; put up the Electrobraid; and then electrify it. How hard can that be?

Fence – Part 2 of ??


There is a general outline that appears to be true about installing any type of tension-based fence.

  1. Decide where the fence is going to go, in particular the location of all the corner, end-posts, and gates.
  2. Install the corners, end-posts, and gate posts.
  3. Put up a line or two of your fencing material and put a minimum amount of tension in it.
  4. Use your line of fencing material to determine where the in-line posts need to go and put them in.
  5. Put up the rest of the fencing material and tension it.
  6. Electrify it.

We finished step one and now need to do step two – install the corners, end-posts, and gate posts.

The directions that came with the fence system remind me of the directions that are in some of the not-so-great textbooks I’ve had to teach out of. They are written by people who know exactly what they are doing to other people who already know exactly what they are doing. They leave the details out, use technical vocabulary that is not defined, have limited visuals, and are super dense. I read and reread and reread the directions referencing and re-referencing the two diagrams they had and still felt like I had no clue how to do this, so I went searching for a video online. There has to be a video online somewhere– right?!  Apparently the answer is: sort-of.

There are a few other companies around the country that sell the Geotek Common Sense Fence and Mule System and one of them is Cashmans in Ohio. Before we purchased the fence I did search around to see if I could get a better price and though some of these places were cheaper, they were all farther away and because these components require freight shipping the additional shipping costs always offset any potential savings. If you are near Ohio Cashmans may be a good choice for you, but they were not for us. I say this because the ONLY video I could find about installing our fence system was part of a longer YouTube video Cashmans’s put out that contains what appears to be various parts of some 1990’s era, VHS quality, video.

I watched the whole video (which was over an hour) and then made Nate re-watch the pertinent parts with me before we went out to install our first corner. The video makes it appear VERY easy.


LIES! Or perhaps more accurately these are condition dependent truths and we do not have the required conditions and they skip over ALL the details.

Places where the video did not match our reality or left out some major details:

  • The four-handled hand-tool they use to install the augers that we received was not welded correctly so we could not get the fourth handle in it and were working with a three-handled hand-tool which meant instead of handing it off to each other we each had to take a side and spin around in a circle. If you are picturing something like the dizzy bat game you are not far off. We were a bit more graceful, but not by much.
  • They were clearly working in loamy soil and not the heavy clay we’re dealing with. Getting each of those augers in took forever and we often had to make use of the tip from the shelter anchors and water the hole, which of course meant delays as we let the water soak in.
  • If you want your post to be straight then the anchor needs to go in straight which is easier said than done when two people with different strength stats are trying to screw it in.
  • The diagonal brace needs to line up in just the right spot on the vertical post, which they don’t mention at all. That turned out to be one of our biggest challenges and led to one of our bigger arguments throughout this process. We were trying to get the angle right and we would get it in, put the diagonal brace on, and be way too high or way too low. Then we’d take it off, unscrew the auger, re-screw the auger and invariably over-correct. After what felt like the five millionth time of overcorrecting Nate was getting pretty frustrated and angry and in an effort to help I said “because the brace is so long a small change in angle at this end results in a large change at the other end” in what I felt was a calm and reasonable tone of voice – though apparently calm came off as condescending and Nate thought I was calling him an idiot. We got over that eventually and now “a small change on this end will result in a large change on the other end” is a recurring joke whenever the process gets frustrating and one of us is getting mad.
  • Securing the diagonal brace to the vertical brace is MUCH harder than they show. Even once you have the diagonal brace in the right spot the company either changed the brace clamps or switched to shorter bolts because we could not get the bolt through the brace clamp enough to fit the washer and the nut on without having to clamp the brace itself. Of course our vice grip was too wide and trying to fit it on the brace and leave room for the washer and space to turn the nut was an extreme challenge. There was a LOT of swearing for that very first corner and then another trip to LeVahn Brothers hardware (I truly love them!) to get a needle nose vice grip which worked much better.
  • Needing to have the vertical post level-ish, at the right height, and with the pre-drilled holes aimed the correct direction was also not mentioned at all and was also a challenge. Particularly because for almost every corner post the holes were not drilled in straight through the post but slightly off to one side or in some cases not straight down the length of the post. It wasn’t till an argument at the second corner that we realized this. Nate was on one side insisting it was aimed correctly and I was on the other side insisting he had lost his mind because they were not even remotely aimed correctly only to realize we were both correct because the holes don’t go through straight.
  • The video shows them doing the four-foot corners which don’t require a horizontal brace but the five-foot corners we have require a horizontal brace. Getting that to line up correctly with everything is also a challenge.
  • The insulators do not go in that easy! It probably has to do with the holes not being drilled straight through the posts so the angles are off just enough to make the bolts catch. In one case it took me over 45 minutes to put in a single insulator! 

But other than that – simple and easy. And they really aren’t going anywhere. It took us an entire day just to get that first corner in, after which Nate declared we’re just buying new fence once we get the barn built and we’re never moving this one.


Now we just need to do 18 more!