Fence – Part 2 of ??
There is a general outline that appears to be true about installing any type of tension-based fence.
- Decide where the fence is going to go, in particular the location of all the corner, end-posts, and gates.
- Install the corners, end-posts, and gate posts.
- Put up a line or two of your fencing material and put a minimum amount of tension in it.
- Use your line of fencing material to determine where the in-line posts need to go and put them in.
- Put up the rest of the fencing material and tension it.
- Electrify it.
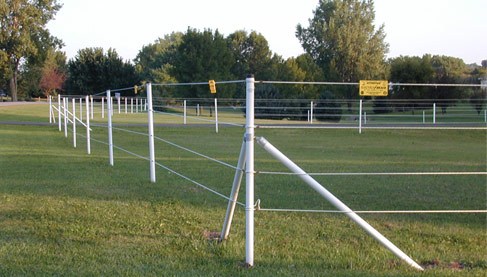
We finished step one and now need to do step two – install the corners, end-posts, and gate posts.
The directions that came with the fence system remind me of the directions that are in some of the not-so-great textbooks I’ve had to teach out of. They are written by people who know exactly what they are doing to other people who already know exactly what they are doing. They leave the details out, use technical vocabulary that is not defined, have limited visuals, and are super dense. I read and reread and reread the directions referencing and re-referencing the two diagrams they had and still felt like I had no clue how to do this, so I went searching for a video online. There has to be a video online somewhere– right?! Apparently the answer is: sort-of.
There are a few other companies around the country that sell the Geotek Common Sense Fence and Mule System and one of them is Cashmans in Ohio. Before we purchased the fence I did search around to see if I could get a better price and though some of these places were cheaper, they were all farther away and because these components require freight shipping the additional shipping costs always offset any potential savings. If you are near Ohio Cashmans may be a good choice for you, but they were not for us. I say this because the ONLY video I could find about installing our fence system was part of a longer YouTube video Cashmans’s put out that contains what appears to be various parts of some 1990’s era, VHS quality, video.
I watched the whole video (which was over an hour) and then made Nate re-watch the pertinent parts with me before we went out to install our first corner. The video makes it appear VERY easy.
Media error: Format(s) not supported or source(s) not found
Download File: https://www.lanternfarmmn.com/wp-content/uploads/2022/07/Corner-System.mp4?_=1
LIES! Or perhaps more accurately these are condition dependent truths and we do not have the required conditions and they skip over ALL the details.
Places where the video did not match our reality or left out some major details:
- The four-handled hand-tool they use to install the augers that we received was not welded correctly so we could not get the fourth handle in it and were working with a three-handled hand-tool which meant instead of handing it off to each other we each had to take a side and spin around in a circle. If you are picturing something like the dizzy bat game you are not far off. We were a bit more graceful, but not by much.
- They were clearly working in loamy soil and not the heavy clay we’re dealing with. Getting each of those augers in took forever and we often had to make use of the tip from the shelter anchors and water the hole, which of course meant delays as we let the water soak in.
- If you want your post to be straight then the anchor needs to go in straight which is easier said than done when two people with different strength stats are trying to screw it in.
- The diagonal brace needs to line up in just the right spot on the vertical post, which they don’t mention at all. That turned out to be one of our biggest challenges and led to one of our bigger arguments throughout this process. We were trying to get the angle right and we would get it in, put the diagonal brace on, and be way too high or way too low. Then we’d take it off, unscrew the auger, re-screw the auger and invariably over-correct. After what felt like the five millionth time of overcorrecting Nate was getting pretty frustrated and angry and in an effort to help I said “because the brace is so long a small change in angle at this end results in a large change at the other end” in what I felt was a calm and reasonable tone of voice – though apparently calm came off as condescending and Nate thought I was calling him an idiot. We got over that eventually and now “a small change on this end will result in a large change on the other end” is a recurring joke whenever the process gets frustrating and one of us is getting mad.
- Securing the diagonal brace to the vertical brace is MUCH harder than they show. Even once you have the diagonal brace in the right spot the company either changed the brace clamps or switched to shorter bolts because we could not get the bolt through the brace clamp enough to fit the washer and the nut on without having to clamp the brace itself. Of course our vice grip was too wide and trying to fit it on the brace and leave room for the washer and space to turn the nut was an extreme challenge. There was a LOT of swearing for that very first corner and then another trip to LeVahn Brothers hardware (I truly love them!) to get a needle nose vice grip which worked much better.
- Needing to have the vertical post level-ish, at the right height, and with the pre-drilled holes aimed the correct direction was also not mentioned at all and was also a challenge. Particularly because for almost every corner post the holes were not drilled in straight through the post but slightly off to one side or in some cases not straight down the length of the post. It wasn’t till an argument at the second corner that we realized this. Nate was on one side insisting it was aimed correctly and I was on the other side insisting he had lost his mind because they were not even remotely aimed correctly only to realize we were both correct because the holes don’t go through straight.
- The video shows them doing the four-foot corners which don’t require a horizontal brace but the five-foot corners we have require a horizontal brace. Getting that to line up correctly with everything is also a challenge.
- The insulators do not go in that easy! It probably has to do with the holes not being drilled straight through the posts so the angles are off just enough to make the bolts catch. In one case it took me over 45 minutes to put in a single insulator!
But other than that – simple and easy. And they really aren’t going anywhere. It took us an entire day just to get that first corner in, after which Nate declared we’re just buying new fence once we get the barn built and we’re never moving this one.

Now we just need to do 18 more!