Fifth Interlude


Round and Round We Go

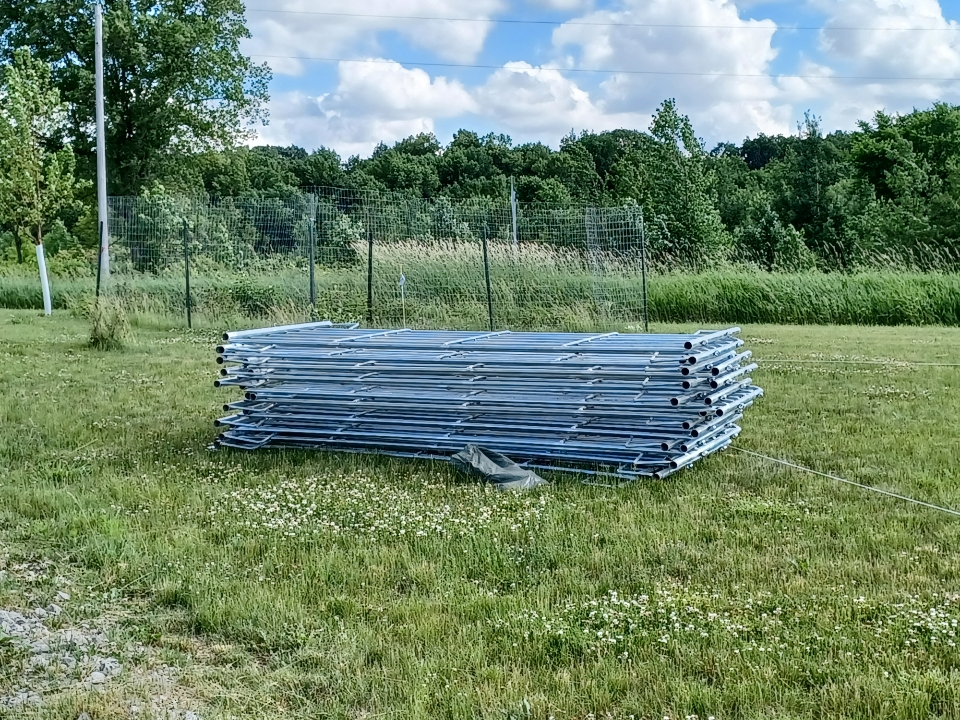
As mentioned in this post, the first time I searched for gates I somehow bought a round pen instead; which then sat in a large pile in our yard. One night after work, when we didn’t think we’d have enough time to work on the primary fence, we thought we could get the round pen up quickly. I know, you think we’d learn.

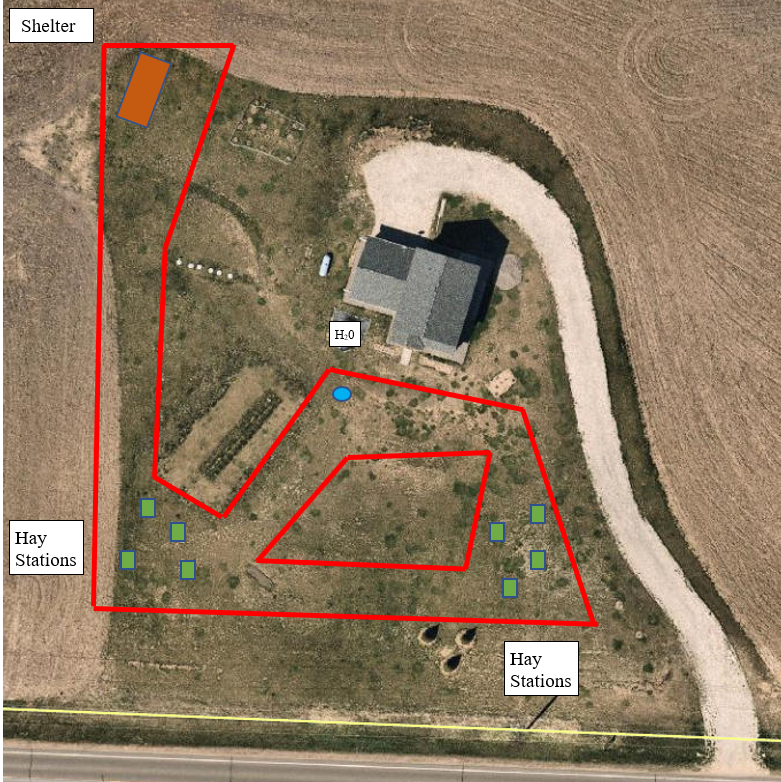
First we had to decide where it should go. The paper version of the layout and the actual version were close but not exact and I was worried about not having enough room where the water will be (north and west) so we planned on making it as close to the other two sides as possible (south and east). There are a lot of opinions on how narrow the narrowest parts of a paddock track system should be, but I opted for 15 feet of space. Since it was a 60-foot round pen with a radius of 30 feet that meant the center had to be 45 feet from each of the south and east fence lines. That was easier said than done since our corners are not 90 degrees, but we got the center figured out and marked it. From there I measured out 30 feet north, south, east, and west and we started putting up the panels. We had differing opinions on the best process for this. Option one was to move each panel to its designated spot but just set them flat on the ground, then once every panel was positioned we would go back and set them up and connect them. The other option was to set them up as we went, though this still required moving three panels first because one panel alone doesn’t stand up. We went with the second option. The issue is in a 60-foot circle the four cardinal directions are far enough apart that there were still two panels worth of space between the three panels at those points. Or so I calculated; there were twenty panels total, three panels at each of the cardinal directions left eight panels total to fill in between the four spaces between the four cardinal directions, which meant two panels per space. (20 – 3*4 = 8; 8/4 = 2).  It did not work out that way. The angles the panels had to meet at was not something I had calculated (I could have, but I didn’t – see previous post about not being that smart after a full day at work) so we were guessing and by the time we were getting to the point where we should be closing our circle we were clearly off; by one and a half panels worth, plus the door. I had forgotten about the door panel when I was calculating – oops. We managed to shift around enough panels so that we got the door panel and that last half a panel in and were only off by one full panel; but at that point we were no longer a round pen, more like an oblong pen. But it was late and we were crabby, so we stopped. As soon as we officially declared we were done Nate saw me staring thoughtfully at the oblong pen and then the space where the water trough will be and said, “You want to move it, don’t you?”

Yes, yes I did.

Staring at a not particularly round, round pen was almost as aggravating as staring at unevenly spaced fence lines. I can’t do anything about the fence lines, or rather I could but the amount of work makes me want to cry, so it was determined that we would even out and move the round pen when we had our friend over to help us with the gate.

This also meant I had more time to think about how to do this right and came up with a much better process. One that I probably could have found online had I bothered to look.

The better way to put up a round pen

  1. Mark out the center. We did that part right at least, and now I had a better idea of where to put it in relation to everything else. We moved it about six feet west and about three feet south.
  2. Actually calculate out the size of your round pen in terms of the number of panels you have. Turns out the twenty 10-foot panels + 5-foot door panel is bigger than the circumference of a 60-foot round pen, by about a full panel! We opted to keep it closer to 60 feet and we just have the extra panel in storage for now. Storage currently being sitting on top of a dirt/weed pile we need to deal with.
  3. Get something (string, tape measure, etc.) that is the length of your radius and tie it to whatever is being used to mark the center point.
  4. Use that string or tape measure and measure out the location of each end of each panel as you place them. This makes sure all your angles are correct automatically.
  5. Have three people to do this!

With the extra set of hands and the better process getting the round pen moved and actually round went much faster and easier. And now it’s actually round!

Now back to the fence, time to get electric.

p.s. do you notice the white bucket? Those little hold digging jerks are back!

The Fence – Part 6 of ??


Let There Be Gates

We still faced the dilemma of no truck and no delivery option for gates; and no place that rents trucks also sells gates. In the end we opted to get these heavy duty bull gates from Fleet Farm, which were on sale at the time, and rent a truck from the Menards just down the road. The first time we went to get the gates they were out of two of the sizes we wanted. We came back home, did another search and discovered they were sold out anywhere we could reasonably drive (being on sale), so we opted to change the sizes for the two smaller gates and try again the next day. They had the new sizes, so we bought the gates in the store, got the little slip that lets you into the “yard” area to pick them up, then drove two miles down the road to Menards, rented the Menards truck, then drove the Menards truck back to Fleet Farm to get the gates. The gate attendant at Fleet Farm gave us some lip about having a Menards truck – dude, if Fleet Farm rented trucks I would have rented a Fleet Farm truck but you don’t, so shut it! When we were in the yard loading our gates, I noticed that the sizes we had originally wanted but were supposedly sold out were sitting right there – of course. I also noticed that I had forgotten to bring any tiedowns this time; we drove VERY slowly home hoping we didn’t lose a gate on the way. They all made it safely and I managed to get the Menards truck back within the 75 minute window so I didn’t get charged the extra $15!

Now we had to figure out how to get the gates on our posts. The normal way to hang a gate is to drill a large hole through your wood fence post and put this giant J bolt through it, but since we have fiberglass fence posts that isn’t an option. The company we bought our fence posts from do sell gate hinge assemblies, but they are $80+ per gate and when you look, there isn’t much too them. I felt there had to be a cheaper option, and we found one! It looked to be about the same thing and it was only $20 per gate. The size wasn’t a perfect fit, but I measured and it looked like they were just a tiny bit bigger so I figured we could make them work.

Once the hinges arrived we went out to install the gates and ran in to our first issue. We had already put all the stuff (the braces and the ElectroBraid) on the end post on the hinge side of the small gate which meant we couldn’t slide the gate hinges onto the post. We considered taking everything off and starting over, but considering we had already tensioned the ElectroBraid five thousand times (okay, nine times) we said, f-it. This is temporary and this gate is mostly going to be used to go in and out to fill and clean water tanks so who cares what side the hinge is on.

As you can see in the picture the cheaper hinge assembly was also more than “just a tiny bit bigger” and was, in fact, too big to use.  Of course. After some staring and swearing I realized I could probably combine some of the pieces of the hinge kit we got with some of the extra pieces from the corner posts we wound up not using because I went and bought a round pen the first time I tried to buy gates. Once the barn is built – it will be built! – we’ll use all the corner posts, but I’ll have figured out a better hinge solution by then (hopefully).

Now that we had a temporary working solution for the hinges, we just had to figure out where to put them on the end post itself. This also proved super challenging; if we had the end post fully installed the braces would be in place and we couldn’t get the hinge parts on, but without having the post up how were we supposed to know where to put the hinge parts? Also someone had to hold the gate while the other person figured out where the hinges should go but the end post wasn’t fully installed so someone had to hold that too. The whole thing took us way too long to figure out, but we did eventually get the end post installed with the hinges on. Then we went to get the J bolts off the gate (they come attached sideways for transport so they don’t stick out) and discovered that we couldn’t. They would not budge. At one point we were actually bending the gate itself, not good. That ended our very frustrating evening; we decided to pause and try again in a few days after a trip to LeVahn Brothers.

The gates are designed with one hinge welded to the gate itself and the other bolted in place so it can be adjusted. We were able to get the adjustable part off and bring that and its stuck J bolt to LeVahn Brothers. I walked in and when they asked what I was looking for I handed them my stuck bolt and said I need to get these two things apart. He said, “I can do that for you.” took it to the back and returned shortly with them separated. Which was great, but I still had seven more stuck things at home and four of them were welded to the gates so I couldn’t bring them into the store to have him very kindly un-stick them for us. It was determined we needed a breaker bar and a really large wrench. I brought my new acquisitions home and they worked like a charm, everything came apart with ease. The proper tools are so important!

In the intervening time I also got much smarter (trying to do these things at night after work is never a good idea, no one is at their smartest after a long day of work) and realized that I could lay out the end post on the ground and lay the gate next to it along with all the other parts and line up where we needed things without anyone trying to hold anything, also we didn’t need to get the gate hinges exactly correct while installing the end post, we just needed to have them in-between the other stuff in the vicinity of their final location.  We also had a friend come over to help us out. Having a third set of hands, proper tools, and a better plan made a huge difference! With all that the second gate went up much faster and easier than the first.

Now we had gates; not 100% square and level, but good enough! On to the last step of the fence, electrification. At this point I have stopped saying to myself “How hard could this be?” or “What could go wrong?” Everything about this has been harder than it should have been, and at this step what can go wrong is electrocution, let’s not tempt fate.

Give me Shelter – Part 2


As alluded to in Part 1 we did wind up purchasing fully assembled and delivered shelters from a company. The starting of this crazy plan coincided with the Minnesota Horse Expo and there were three shelter companies that were there: West Wind Shelters, Buildings by Alpha, and RFC Portables. All three companies make what appear to be great products. Buildings by Alpha is the farthest away and their delivery cost was significantly higher (understandably) so I didn’t pursue them. That left West Wind Shelters and RFC Portables. The overall cost was on the surface cheaper for a West Wind shelter, but their largest shelter is 10 feet by 30 feet whereas RFC Portables largest shelter is 12 feet by 36 feet and when I calculated out the per-square-foot cost the RFC Portables shelter was cheaper per square foot. There are some other differences to consider, however. West Wind shelters are made on a steel frame that goes all around every edge of the cubes that are the basis of the shelter itself. Versus a timber frame for RFC – RFC also has two versions, one they call the “EZ Move” that has a timber frame all around every edge but it’s a pretty chunky frame and adds to the cost, and the standard one that is truly open front and has nothing running along the bottom edge of the open side of the shelter. Other differences include an all metal outside sheeting for RFC and half-metal half-wood for West Wind Shelters, and lastly the other big difference between the two is that West Wind Shelters anchors their shelters for you when they deliver them and RFC does not provide anchors or anchor them for you. At the time I felt that maximizing square footage and minimizing my cost per square foot were the two most important things – also if my friend and I are going to build one of these shelters on our own, then a timber framed shelter would offer a template for us to work from. With those things in mind we went with RFC Portables and ordered two 12 foot by 36 foot shelters, light gray with white trim and roof.

Quick tip for anyone purchasing a premade structure. See your color options in real life, not just a computer screen! The little chip from the photo said “light gray” and on my computer it looked like “light gray.” But once they were here and in the same visual field as my light gray house, those shelters are taupe! Nate insists no one else will notice or care, but I have to regularly talk myself out of going to the store to buy paint and am successful only because there are so many other things we still need to do!

Because of the maximized length they couldn’t actually span that whole distance with an open space so these shelters are really more like three 12’ x 12’ bays connected together with dividing walls between them. In the shelter that will be a shelter the dividing walls go most of the way up, but in the shelter that will be my make-shift temporary barn I asked to make the dividing walls only half walls and to put a gate in the middle of the wall so I can get in and out of the side bays from the middle bay. This way in winter I can block off the two ends from the worst of the weather and have a somewhat protected space – that is the hope at least.

It took RFC about five weeks to build them and then they were delivered. I should have filmed the process because it is a little mind blowing. They come fully assembled on these flatbed trucks and then they tip the bed of the truck up and let gravity just slide them off. Though they did send me these reference photos as we were figuring out the logistics of whether the open side should be facing the driver side or passenger side for the purpose of unloading them.

To help stabilize them during transport and unloading they have a variety of braces including a very long piece of lumber across the bottom of the open side (where the West Wind Shelters have a steel frame and where the EZ Move shelters have a permanent skid). The first shelter slides off the truck and mostly where we wanted it, it was off by about foot on one end, but considering gravity just slid a 36’ x 12’ three-sided shelter off a flatbed truck, being off by only a foot on one end seemed pretty impressive. The second shelter did not slide off as cleanly, it started sliding off the back of the truck as well as the end of the truck so by the time it was on the ground it was about three feet off from where we wanted it. They looked at it and declared that we could just move it with a skid steer  You know – that skid steer we do not have. If you are not familiar a skid steer is the generic name for the machine, though you may have heard of them as a Bobcat, that is a specific company that happens to make skid steers (kind of like facial tissue and Kleenex). Or we could move it with a truck and chains – you know – that truck we also don’t have. They did leave us with the giant pieces of bracing lumber that ran along the bottom edge of the open side since we would have to move it so much. Then they left and we had to figure out how we were going to shift this giant thing.

We did look into renting a skid steer but the rental starts at $150 and goes up from there once you add delivery, time, etc. There is also the tiny issue that neither of us has a clue how to operate one. We asked around a few places and were in the midst of arguing over the merits of trying to do this with a truck and if so do we rent a truck or see if we could borrow someone’s when I decided on a whim to call the neighbors and see if they by chance had a skid steer and could they possibly help us out and they did! But they were unavailable for a few days, but the neighbor another two houses down also had one and she was sure he would be happy to help. She kindly gave me their name and number and having never met this person in my life I called to see if they could do me a favor – I felt very awkward – “Hello stranger I have literally never met, can you help me?” Asking for help is weirdly hard for me. But he was super nice and came over the next day to help us out. The shelter that was off by about three feet, but still had the braces on, shifted pretty easily once we got everything positioned correctly so I thought – hey, that went so well, lets shift that other shelter, the one that no longer has a brace, over just that one tiny foot. We positioned everything and started moving it when I noticed that the dividing walls between the bays were NOT moving with the far wall. I said “good enough” lets stop there, thanked him for his time and willingness to help out a total stranger, and we both went about our days. Later that day I was laying out where the fence needed to go and happened to look at that second shelter from a different angle and saw that one of the dividing wall between the bays was no longer square – it was pretty seriously bent out of true – crap! It took almost an entire day for me to work up the courage to text him and ask if he could come back out to help fix it – why is asking for help so hard? I finally managed it because I mentally reversed our situations, and I would in a heartbeat help a neighbor if I had the equipment and would have no issue coming back out if it didn’t go exactly right the first time. Seriously – need to work on the asking for help thing. He came over the next day and all we had to do was lift that wall up a few inches and the act of sliding the skids back out shifted it back into place (mostly) its not 100% square, but like 98% square – which is still a high A.

Now we just needed to anchor them. How hard could that be?

Best Laid Plans


It should surprise no one that my original paddock track system layout has been modified significantly from its first iteration however, before I go into more details a brief public service announcement.

There is a saying in the horse world, “two horse people, three opinions.” It is not unusual for people who are passionate about something to also have strong opinions about that thing, but for horse people, particularly those living near a metropolitan area it sometimes seems more pronounced. I think it has to do with the increasing cost of having a horse close to an urban area. Anyone willing to put so many other wants, and occasionally needs aside – I still have one pair of pants I can wear to work, that’s enough, right? – to afford a horse and/or has that much money to begin with comes with a certain amount of crazy passion. 


Please note the complete and utter lack of sources or any information about my data collection methods – that’s how you can tell this graph is legit.

I mention this because if you, person reading this, have horses yourself you might have some opinions on some of things I’m going to talk about in this, and future, posts; and they might be different from the opinions I have and the decisions I made. I am happy to have a conversation about our differences in opinion, either in the comments here or on Facebook, I ask only that they not be in the form of “What you are doing is stupid and wrong. Let me tell you why…” 

On to the original plans. As I mentioned in a previous post, the layout of Leeloo’s new home is based on the work by Jaime Jackson and his Paddock Paradise book/website/Facebook group. The ultimate goal is to get my horses moving as much as possible and living in a way that more closely resembles the way their wild/feral relatives live so they can be healthier happier horses. There obviously have to be some concessions, but I am trying hard to keep that primary goal in mind.  Below are the first few drafts I had put together.

I spread out the big three needs (water, hay, shelter), so that the horses have to travel to get from one to the other. Ideally the paddock track makes one big continuous loop so that no horse can ever get trapped in a dead-end by another horse being a jerk; however it is not unreasonable to have offshoots as long as the end of an offshoot allows a horse to get away from said jerk. Leeloo has been described by the barn manager of our current barn as being the most dominant horse on the property who is tough, but fair, “Leeloo will only kick someone’s ass if they deserve it.” That being said, minimizing any damage a tough but fair Leeloo can do is still a goal. One of the constant tensions anyone with horses has to deal with is the desire to keep our animals safe with the need to allow them to be horses, and horses have hierarchies that are determined through physical means, some which can cause injury – which sucks.

You can also see there was a question about water. Because this is all temporary until we can get the actual barn built, we aren’t doing things like digging new water lines so the water for the horses needs to come from the spigots by the house. And because we live in Minnesota the water also has to be close enough to an electrical outlet that we can get a tank water heater in it. We have two spigots and exterior outlets on our house, a set in front and another in back. Originally, I had a convoluted plan to run the hose and the extension cord up and around our garage door, but then remembered that we have that other set on the front of the house – so the water moved there.

There is only one large flat area that isn’t too close to the septic system and isn’t currently corn field so that is where the shelters landed. From there it was a matter of going around some trees, the septic system, and the house.

Obviously I can’t just show Leeloo the drawing and ask her to please keep to the designated areas, so we need some fence. Several years ago I had reached out to some of the people I know who have their own barns or horses at home and asked for one thing they would absolutely do again, one thing they would absolutely change if they were starting from scratch, and any recommendations for various horse related products, companies, etc. One of those recommendations was for Monica and Bluebird Fencing. Monica is amazing and has been super helpful through this whole process. We talked on the phone for a solid hour that first time while I explained what we wanted to do (track system); what my priorities were (1st – safety, 2nd – cost, 3rd – ability to move the whole thing in the future); what animals we were hoping to have (full sized horses, donkey? pony? goats?) and landed on Electrobraid as our fencing material and the Common Sense Fence system by Geotek as the corner and in-line post system (more on how that has been going soon). She then asked me to send her my plans so she could price it out and give me a quote. I sent her the plans above and she got back very quickly to say I may want to rethink them. As originally drawn I was looking at a VERY expensive plan because every change of direction was about 20 times more expensive than a straight in-line post, and every corner was 30 times more expensive than a straight in-line post and there were a LOT of corners and direction changes in those early plans. With that in mind I sat back down with the goal of minimizing corners but still getting Leeloo to all the places I wanted and keeping her off all the places she couldn’t be on. And here was the new plan that we are in the process of putting up:


We got it down to thirteen corners and three gates, which at the time seemed very reasonable. Ignorance, what bliss.

Where Will She Go?


Coming home from that uplifting appointment I tell Nate that I want to try to bring Leeloo home this summer and though supportive, he was understandably skeptical. We had already agreed to, and taken payment from, a local farmer to farm most of our land for this year, so where exactly was I going to put Leeloo? Also the whole point of bringing Leeloo home was to get her to move more – how exactly was I going to do that?


In the course of our lameness issues, we have worked with at least six different vets, six different farriers, four different chiropractors, a massage therapist, acupuncturist, and osteopath. The one thing they all agreed on was that Leeloo needs to move more, and move in terms of low intensity activity, i.e. walking. So how do you get a couch potato of a horse to move more? I’ve been pondering this for years now, and a while back when discussing this issue with a friend I shared my ingenious (laughable) idea for a hay feeder that would force my horse to move. The general outline was creating a long rectangular box which you would put a perforated barrel, filled with hay, into and Leeloo would have to roll the barrel up and down the track to get the hay out. There are obviously lots of flaws to that idea, but my friend was very kind and just listened and when I was done, asked if I had heard about paddock track systems. I had not.

The basic idea is that you spread out the horse necessities (food, water, shelter) in different locations that require the horse to walk between them. Intrigued I searched the internet when I got home and discovered Jaime Jackson and Paddock Paradise. I acquired his book of the same name, devoured it, and knew that this was my answer. This was how I was going to get my horse to move! One of the many beauties of the Paddock Paradise system is that you don’t need a lot of land to make it work. So, I pulled up an overhead view of our land (thanks ever present observation satellites, your existence isn’t creepy at all) and thought yes – I can get a paddock paradise track set up around our existing yard and house.

We can do this!

Why Now?


So why now? What happened to make me nudge that eyelash and come at my goal of bringing Leeloo home in a different way?

Leeloo has lameness issues, and no, I don’t mean she thinks fanny packs are cool, though apparently fanny packs are cool again? Lame as in not sound enough to ride. I’ve been attempting to get to the bottom of her ongoing lameness issues for years and have spent a lot of time, money, energy, and hope – all followed by heartache – and gotten nowhere. Last summer, when I was adjusting to the fact that the cost of my barn had apparently gone from x to 3x and silly me I had only saved up x (if you are asking yourself, wait, didn’t you say it was 5x – you’re thinking of the price quote I got this year; 3x was the quote I got last year – isn’t our current economic state fun?), I decided that the barn dream was clearly being postponed so I would instead focus on getting Leeloo sound in her current living situation. This led to yet another very expensive vet visit, which I’ll detail further in a future post in case anyone wants to nerd out about equine lameness checks, but the end result of that visit was a decision to inject her right hock. Did the injections help? Who knows! We spent the next several months going through round after round of hoof abscesses – which are just as much fun as they sound. One hoof after the other, round and round, for months. I would maybe get two or three weeks of soundness before the next round began. But then very early spring this year she was lame again and it wasn’t an abscess. The vet was back out and we tried another set of injections (they wear off between 6 months and a year and we were at 9 months). And what did they do this time? You guessed it, nothing. Right around this time my farrier was out for our regular trim, and I was expressing my frustration as he was looking at her back feet and asked “How much does she move? On a scale of 0 to” – ZERO. She moves not at all. The way her current situation is configured the round bale (giant bale of hay) is under the shelter and right next to the water. Leeloo also happens to be the most dominant horse on the entire property, so nobody moves her. She can camp her butt at the round bale, pivot to get a drink of water and then pivot right back to shove her face in food. All day, every day. When the weather cooperates the horses do have a pasture they all go out on, but there is only one pasture so the barn owner is very protective of it and that means once the spring thaw starts the horses don’t go out at all until the ground is firm and the grass is established for the year. I mentioned to the farrier that I come out to the barn regularly to exercise her and his response was – “It doesn’t matter, you could work her every day, what she needs is constant low level movement – lots and lots of walking and even with that there is no guarantee she’ll be sound, but it’s just not going to happen in her current situation.” After that fun pep-talk I was leaving the barn and sitting at the top of their driveway staring at my own house (I live very close to where Leeloo is currently being boarded) I saw my own patch of yard around our house, surrounded by a tilled field and thought… maybe, just maybe, I could figure out how to bring her home now.


Eyelash Wishing


Did you ever do that thing when you find a loose eyelash and you blow it off your finger and make a wish? I have no idea where I got that habit from, but I’ve been doing it as long as I can remember. For years now when I would blow that eyelash off my finger my wish was some variation on “I want my barn” and for a really high number of tries the eyelash wouldn’t float away, it just sat there, no matter how hard I blew – this is very bad luck. So, I would give it a small nudge – I would NOT push it off my finger myself, that would be terrible luck – but I would just shift it a bit and try again. Sometimes it took a few shifts before it would blow away. Anytime I had to do this I would tell myself I am not doomed to failure, it’s just that sometimes you need to make some adjustments to reach your goals. – Well friends that is what is happening. We’re making some adjustments to reach my goal of bringing Leeloo (our horse) home. Plan A – part 1 (the dream) involved a large indoor riding arena with a “barn” on one end with stalls, tack-room, bathroom, hay storage above. This would be centered behind our house. Then there would be pastures and a paddock paradise track system to our east and a hay field to our west. Plan A – part 2 also involved another outbuilding for a tractor and hay making equipment and more hay storage. That is still my dream but with the current state of the economy, inflation, prices, etc. it is still a very distant dream and meanwhile I am getting older, my horse is getting older, and every new election is a chance that my zoning could change and bringing my horse home would no longer be an option. So this spring, after much discussion, Nate and I have decided to make some adjustments to the stages of that dream – we’re nudging the eyelash a bit – so we can bring Leeloo home this summer! You can follow along on this process here.

What have I gotten us into?!